Game Based Learning, Google Forms, Google Slides, Syllabus, Virtual Learning

Syllabus Activity

I have been a fan of John Meehan since he wrote a guest blog post on Ditch That Textbook. His book EdRenaline Rush is also amazing! He is a very helpful, kind, giving educator that you should definitely follow on Twitter.

This is an activity he posted last year and again this year. Many people have taken his idea and put a spin on it. Here is mine, along with some resources I use. Full credit goes to John. I’m so glad he is part of my PLN!!!

We will begin remotely this year, not because of Covid but because of an “air-quality” issue in our building, resulting in a complete gut our our building. All of our books, resources, supplies, decorations, etc. were thrown in the trash. 😦 That was 20 years of memories gone. The good news is when we return, our building will be safe for staff and students (well Covid safety measures will still be in place!!!).

Since I will start virtually, this activity is set up for remote students. John has his set up for in-person OR virtual.

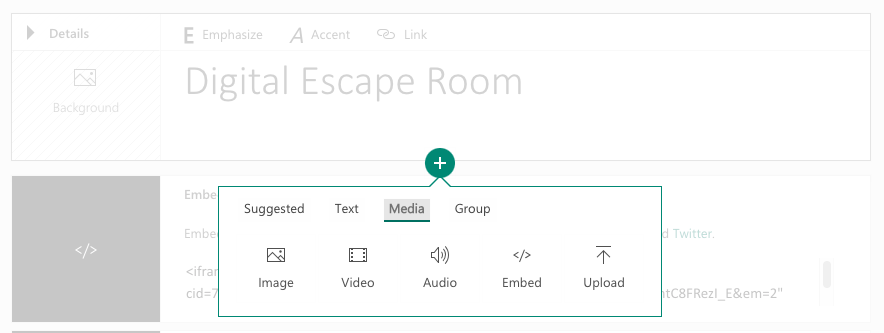
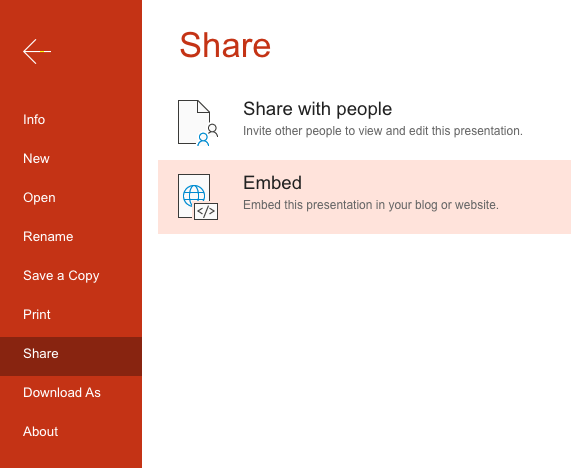
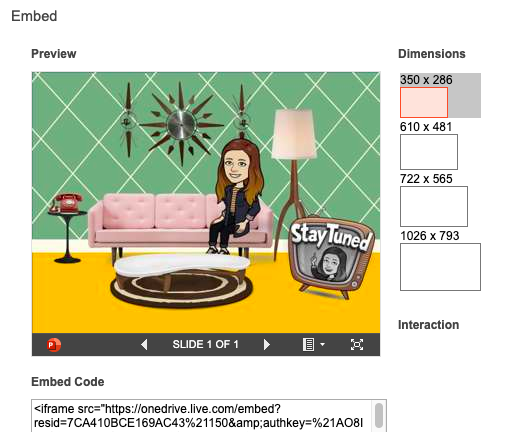
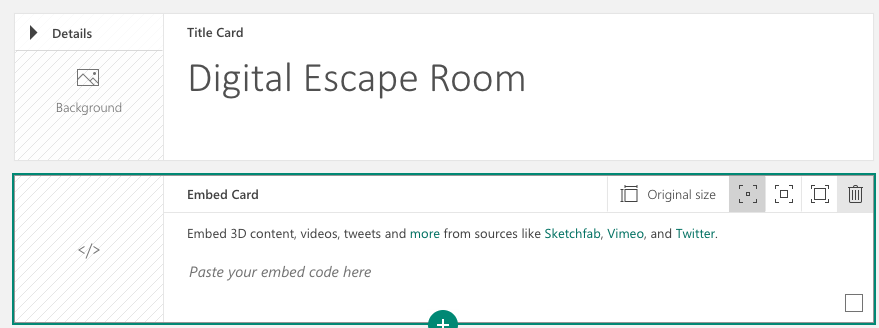
Inside this activity I link to the following:

click to open

This template has additional colors to choose from.

click to open

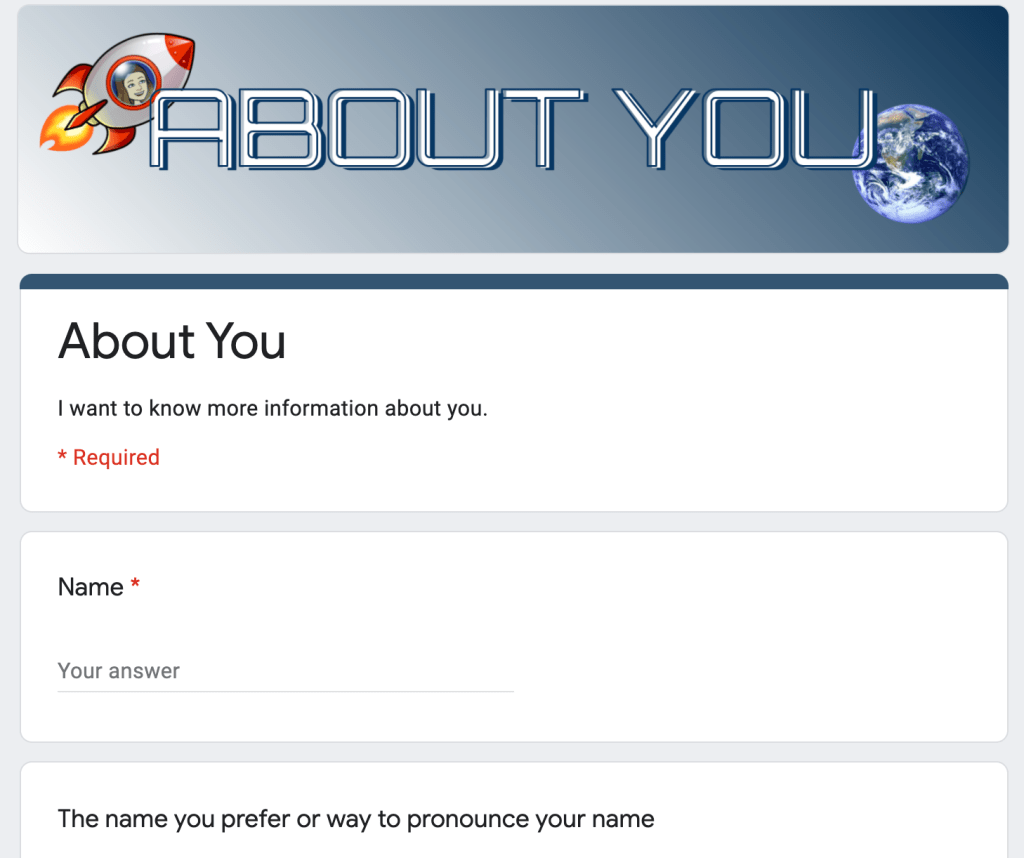
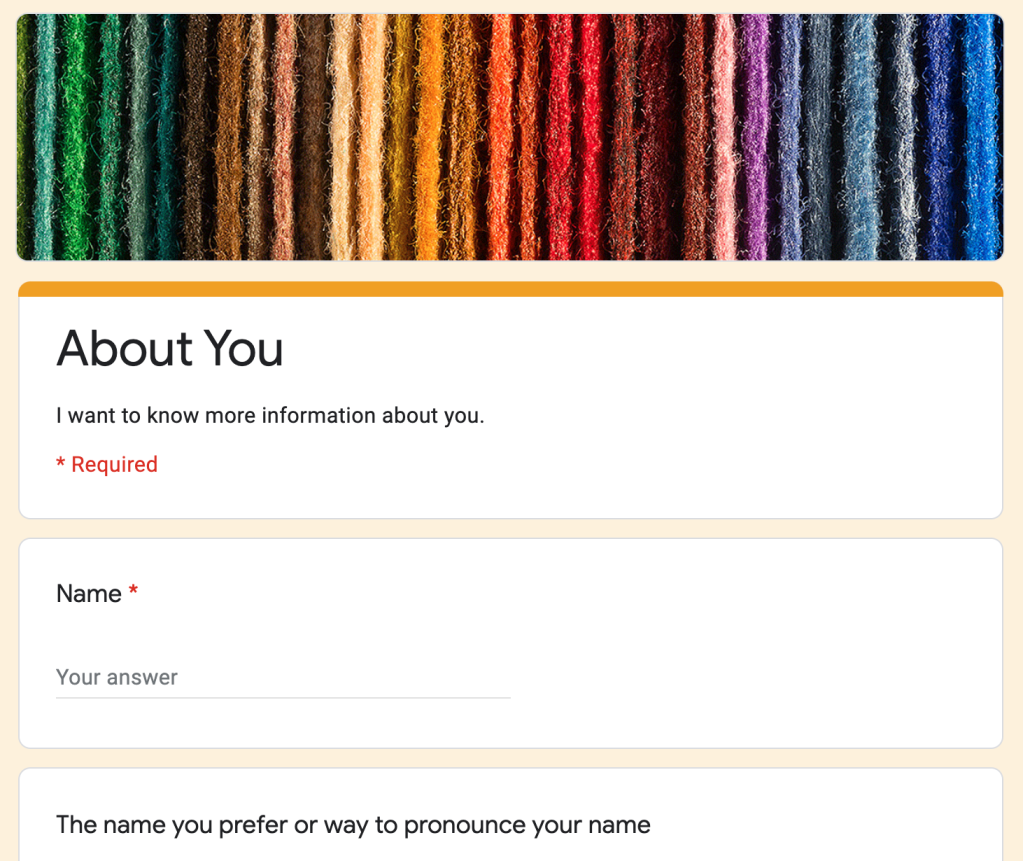
This is the same about you activity I’ve shared before. I made the header match our theme.

click to open

John has some of this type activity on Twitter if you want to give choices. Choices are good!

Click to open

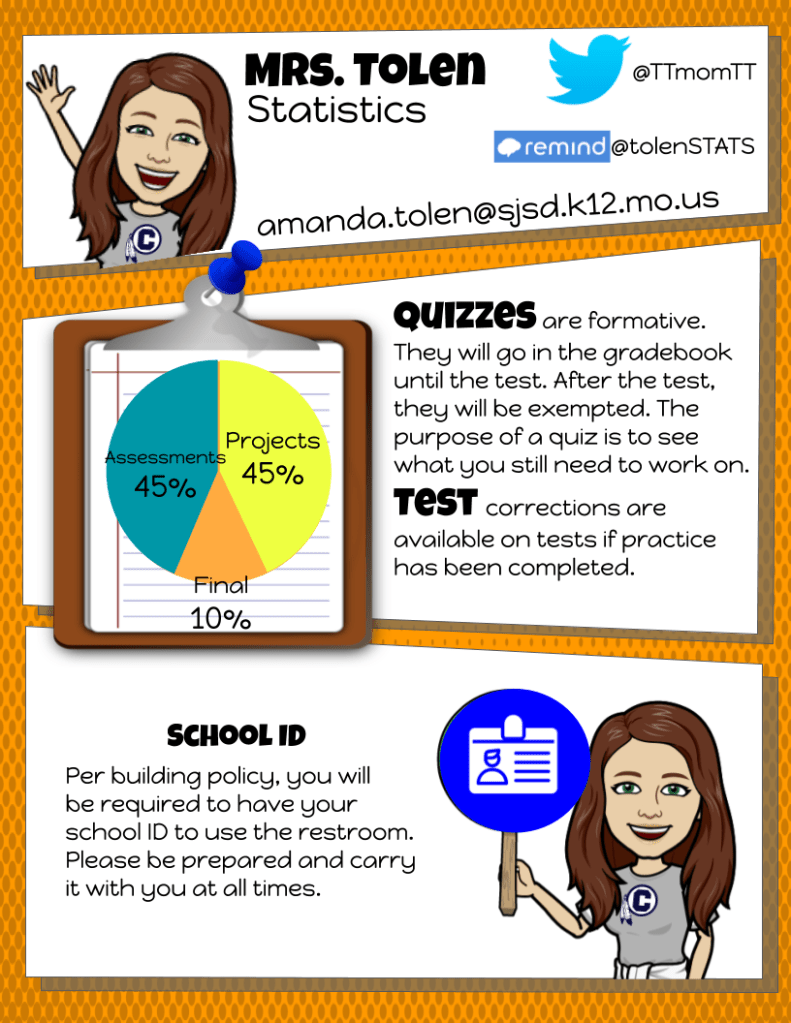
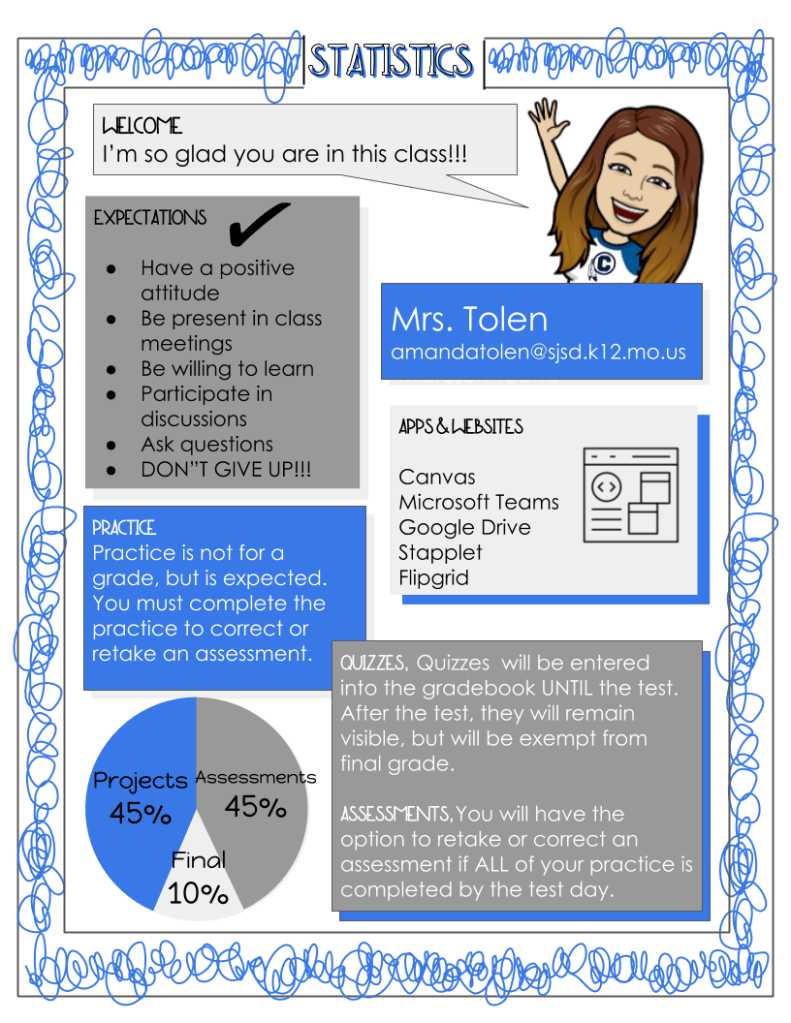
This is a different syllabus template I’ve used in the past. You can also change the background color.

I know this seems like more work that just printing your syllabus, but imagine the excitement for your students to explore and learn about your class in a fun way and not just listen to you as you explain your syllabus.

If you make one of these, please tweet out to John @MeehanEDU and me @MandiTolenEDU. We would LOVE!!!!! to see them.

Distance Learning, EdPuzzle, Google Forms, Google Slides, Virtual Learning

Interactive Video (Ed-Puzzle Hack)

I LOVE EDPUZZLE! It’s a quick way to help students engage in a video they are watching. It’s also great for virtual learning. What I don’t love about EdPuzzle is the limitations in the free version. You only get 20 free videos. That will get me through, MAYBE, my first 2 units. You can refer people to EdPuzzle to get more, but who has time for that?

If your district will pay for the PRO version of EdPuzzle, DO IT! Most districts, however, are not in a financial situation to do this. So, I’ve created a HACK to have an EdPuzzle like experience. You can use it IN the classroom or during VIRTUAL learning.

Pros and Cons of my Hack–Pro, it’s free! Con, you can’t prevent students from moving ahead a slide to see the answer.

So here we go… I have two different approaches for you.

Google Slides

You can trim videos INSIDE Google Slides. Just insert your video. When you click on it (not the play button, but the video itself) you will get a Format Slide button right above the slide. Click on it and it will open a menu to the right. You can set the start and stop time for this video clip.

Put your question and answer box on the slide.

I duplicate the slide, and set my start time on the next slide exactly where I left off on this one before. The I watch the video and pause when I want to stop. You can click the button “use current time” to set it that point. Change your question for the new slide.

Keep going until you have each slide set for each question you want to ask.

This is the type of slide activity that you use NOT IN PRESENT MODE. You will also want to set it in Google Classroom to make a copy for each student. They will submit their completed Google Slide when they are finished.

Click here to get the template of my activity.

Slides + Forms

The drawback to JUST using the Google Slide is having to open each student to see their responses. I with we could clip videos in Google Forms, but we can’t, so here is my solution.

Create your Google Slide JUST LIKE I DID for OPTION 1. I just left the questions off.

Now, I’m going to create a Google Form to accept the answers.

If you have never used Tab Scissor and Tab Glue, you’ve been missing out. If you have your tabs open side by side and click Tab Scissors, it will open the tabs in two equal windows. When you are finished, click tab glue and it puts it back together.

This way students can see the video and question at the same time. You can also hit present to make it full size and when you hit ESC it goes back to the split screen.

To recap, if you need less than 20 videos, use EdPuzzle. If your district will pay for the Pro version, use EdPuzzle. If neither of those work for you, use this Hack.

Let me know if you use this. Shoutout on Twitter, Instagram, or Facebook at tag #MMNS and #infinitelyteaching!!!\

Happy Creating.

Bitmoji, Distance Learning, Google Forms, Google Sheets, Relationships

Get to Know Your Students

Relationships are so very important. If you want to connect with your students, you need to know your students and they need to know you and each other. I try to build a climate and culture in my classroom of family. I want it to be a safe space to learn, fail, share, and grow. Students will never feel comfortable doing this if they don’t know each other.

Here are a few activities I’ve done to help us get to know one another and create that family climate.

Google Form Survey

This document does more than gather information. I play a game at the of class periods that run a little short. See, if my students get done early, they pack up and migrate toward the door. This is problematic because so many students clustered around the door causes issues (and our administration has made it an expectation to NOT line up at the door). I will open the spreadsheet from this form and play guess who. Now let’s use some common sense here! I do ask students some personal information like internet access and food allergies. DO NOT USE THIS INFORMATION for guess who. I know you won’t but I’m putting it out there JUST in case. Students love to play this game and they get to know each other a little as we go. It also keeps them in their seat and engaged until the bell rings. This Google Form idea came from Jennifer Gonzalez. I found it in this blog post with many other great ideas including ice breakers. The guess who game idea came from a retired administrator I had during my specialist classes.

Collaborative Slides

I have been using this slide activity for quite a few years now. I like it because we learn about each other the very first day but I can also teach students how to use Google Slides, a tool we use OFTEN in my class. I assign it through Google Classroom and every student has access to the SAME document. This means you need to make a copy for each class. I forgot once and had to make a copy of the completed activity and delete the slides the students had added. Not a complete disaster but wasted time. I post this activity at the TOP of Google Classroom so students can access it any time. I also make sure any new students who join us later in the year complete it (same with the Google Form).

A NEW Collaborative Slide

This is a NEW collaborative slide idea I saw on Twitter. Pamela Bradley (@4pambradley) shared on behalf of Lauren Vining. I LOVED IT, and not just because it had a Bitmoji (I give other options BTW). I wanted the lockers to be a little bigger and I wasn’t sure about the copyright of the locker image used so I made my own version in Google Slides. I plan to have the students use this activity just like I did the previous one. I will also get to introduce remove.bg and unscreen.com to remove the background from images and animated gifs. This way they can add a picture of themself if they want.

All of these activities (except or guess who, and maybe even that one via Meet or Zoom) could be used for virtual learning too.

Now, go build those relationships!

Digital Escape Rooms, Google Forms, Google Slides, Microsoft, PowerPoint, Sway

Digital Escape Rooms with Microsoft

If you’ve been around the blog for awhile, or follow me on Twitter, you know my love for all things Google. When I created my tutorial for Digital Escape Rooms (posted on Ditch That Textbook) it was using all Google apps.

I know some fellow educators out there are not in a Google school. Other educators are Google schools but they can’t use Google Forms.  Never fear, here is a tutorial to create a digital escape room using Microsoft Sway, PowerPoint (or Google Slides) and Forms.

The process is the same except for the location of the image and the last step and you can even use Matt’s planning template.

Digital Escape Room Infographic - Microsoft  Matt's Creating a digital escape room template

1. Write your prompt

You need a good story to hook the audience. When you go to a physical escape room, they set up the situation with a story or information at the beginning. The purpose of this Halloween themed digital escape room was to share some tech ideas with my staff in a fun way.

So I wrote an introduction to tell my audience what was happening:

“It’s a blast from the past! But when I blasted from the future to my 50’s living room, I lost my copy of Ditch That Textbook. Click on the clues in the room to help me find my signed and treasured copy.”

2. Create your clues

Determine how many and what kind (number, word, etc.) of clues you want. I want this escape room to be a fun activity for teachers to do as stress relief at the end of school and maybe gain some inspiration for next school year. During this step, I also created all of my clues. Some are in PowerPoint, Docs, Excel, Jigsaw Planet, etc. I keep all of these in a folder in One Drive so everything is together.

Here are the clues I used for my digital escape room:
  • Microsoft Training Site through a Sway page – CLUE: VV (1)V (2)which translates to 503 with the pigeon number cypher.
  • Editable PDF hack in Google Slide – CLUE: EDIT with alphabet cypher translates to 761122
  • Choice menus from Kasey Bell – launched from an excel sheet – CLUE: BUFFET
  • Using animated Bitmoji’s from Snapchat – launched from a cypher in Docs – CLUE: DANCE

Here is a Wakelet collection with even more clue making resources.

3. Create your image(s)

I almost always have an interactive image that I create in Google Drawing. But to embed in Sway, you have to use used something with an iframe embed code. I know, what the heck is that. No worries, I’ll walk you through it later. In the mean time, use PowerPoint (or Google Slides) to create your image. We will embed this in our Sway at the end and the links or “hotspots” will remain active.

Open a new PowerPoint (or Google Slide) and start creating your scene. I changed by screen size to 4:3. You do this under the design tab, then select slide size.

Screen Shot 2020-05-08 at 2.20.49 PM

It can be as easy as a single image (the reindeer in this Reindeer Games digital escape room), or as fancy as a full scene (like the image below).

Slide1

Once your image is created, you may want to download this and set it as your background. This prevents you from accidentally moving one of your components while setting your hotspots. To download the image, click on the File, then download as images. This will make a zip file. You will have to unzip it (double click usually) to use it. Once you have the image, then click on the Design tab and choose Background, picture from file. Navigate to you photo and upload it. Don’t forget to select all and delete everything from your page (it’s scary, I know, but you have an undo button). You will see your image set as the background.

Screen Shot 2020-05-08 at 2.45.29 PMScreen Shot 2020-05-08 at 2.47.31 PM

After your image is created and set as your background, you need to link your clues to each object. I have 5 clues, so I linked it to the clock, phone, tv, coffee table, and pink sofa.

You can make anything you added to your image clickable as a link! PowerPoint 365 is a little different than Google Slides. You can use a shape or textbox for this next step. If you use a shape, set it to no fill and no outline. If using a textbox, delete the text. Double click on the shape or click on the textbox and go to the insert tab and choose link. Screen Shot 2020-05-08 at 2.56.22 PMType or paste the URL for the clue you are linking. To prevent the text from showing I use a period and change it to the color of the object it’s over.  If you are using anything cloud based, make sure share settings are set for anyone to be able to view.

If you are using the desktop version of PowerPoint, you can just right-click on the shape you drew and add your link. It’s much easier on the desktop version. You will have to your PowerPoint to the One Drive cloud to get the embed link.

Some breakouts may have more than one image or page. In my trianglesonly.com breakout game, I had multiple pages on the top tab to replicate a dating site, so I repeated the process for each image I created.

4. Create your locks

If all of your clues are numbers and you have the pro version of Microsoft forms will can create your locks in Microsoft. You can create create a cypher for each clue to change it from letters to numbers. I show some examples in this escape room. You can make your Cypher images in any image editing program. You can also use PowerPoint and download the files as .jpg or .png.

I don’t have the pro version of Microsoft Forms so I’m using Google Forms. Create a new Google Form (I keep everything for each escape room in one folder). You want to use response validation (check out this video for a walkthrough on how to add it) so they have to type in the correct clue. You also want to make the question required.

Adding response validation to Google forms.

For number locks, I use the number is equal to setting then type in the number you want. You can also type in a custom response if they get it wrong. For a number, I usually just use “try again”.

Example error message text for digital escape room locks in Google Forms.

For letter locks, you will select text contains. Forms are case sensitive so my clue usually directs them to capital or lowercase letters.

Example help message text for digital escape room locks in Google Forms.

Continue this process until you have all of your clues entered.

I like to include a special message or image once the person “escapes”. To do this, create a new section in your Google Form.

Digital escape room locks: add a section to your Google form.

On this new page, you can post a message or an image congratulating them on escaping.

Digital escape room locks: add an image or message to Google Forms.


5. Create your Sway

In my opinion, this is the most exciting part of the process. This is when everything you have created comes together as an escape room.

Got to sway.com and start new. A title card will always be the first card offered. Title your Sway and add any images you wish. There is a design tab if you want to play around.

Now add you image (or images). Click the plus sign, then the media tab, and then embed.

Screen Shot 2020-05-08 at 3.08.42 PM

Now let’s go get our embed code. Your image is in PowerPoint (Google Slides instructions will be below). In PowerPoint, click file, share, and embed. Copy the embed code.

Screen Shot 2020-05-08 at 3.10.30 PM Screen Shot 2020-05-08 at 3.11.47 PM

Head back over to sway and paste the embed code in the card.

Screen Shot 2020-05-08 at 3.13.03 PM

Google slides will need to be published to obtain the embed code. Go to File – Publish to Web. When you click publish, an embed code will be available.

Now let’s insert our Form. Whether you use Microsoft or Google, the process is very similar. Click the + in Sway and select Embed again.

Go to your Form. Click Send then the <> tab to get the embed code. Paste this code in the Sway card.

Now you are ready to preview your Digital Escape Room. Click the play button in the top right corner. How does it look?

When you are ready to share with others, you use the share button. You can copy a link or create a QR code.

Whew! You made it to the end. Now you are ready to go create your own Digital Escape Room with Sway.

You can try out the Digital Escape Room created during this post with the link below.

https://sway.office.com/s/2Hvb5Qm4ehy2Mn54/embed


Choose Your Own Adventure, Geometry, Google Forms, Solving Equations

Choose Your Own Adventure *Updated*

A lesson is only as good as the updates you make. This activity, which I first blogged about here and here, came from Ditch That Textbook by Matt Miller. I love this idea and now use it as an alternative assessment activity. Please go back and read how this started for me.

One reason I love this activity so much is because it gives students choice and freedom of topic, they become the teacher so they learn the content more deeply, they peer edit which is a very crucial skill, and this year I added a Flipgrid component in collaboration with another school.

I have updated my planning documents a little. They are posted on the posts, but this will be the most up-to-date document I have. I have also created a Google Slide presentation so very little teacher direction is needed. Another update I made this year was to increase the level of peer editing. Students do not intuitively know how to do this, so I updated the document so they have a little more guidance. Lastly, and probably the most exciting part for me, was creating these CYOA stories for a sister class in another district. We sent them our completed stories and then each student left feedback via Flipgrid. We’ve sent our stories to this district before but having video Feedback through Flipgrid was amazing and meant a lot more for my students.

I’ve included some fun examples from this year. I encouraged my Geometry students to create circular images as part of the story.  You can check the links above for examples from previous years including some Algebra 1 examples.

Screen Shot 2018-06-22 at 7.26.53 PM           Screen Shot 2018-06-22 at 7.29.53 PMScreen Shot 2018-06-22 at 7.32.39 PM

Including the Flipgrid responses from our sister school was an amazing addition. My students loved seeing the faces and hearing their reviewers. It also made the audience “authentic” to them. We did get permission from their parents for my students to view them but we did not include releasing it publically so I can’t share the link to the grid. I’ve included a screenshot of the grid below.

Screen Shot 2018-06-22 at 8.10.36 PMScreen Shot 2018-06-22 at 8.10.08 PM

You can find a link to my resources below.

Planning Guide – 2018 CYOA Scoring Guide-Algebra

2018 Choose Your Own Adventure Planning Guide-Geometry

Slide Presentation – CYOA Planning Guide.png

Student Peer Review Document – 2018 CYOA Scoring Guide-Algebra

2018 CYOA Scoring Guide-Geometry

Here is an example of a peer review. In my experience, you need to model this for your students. I have, in the past, peer-edited my own story with the class so they see what to look for.

Screen Shot 2018-06-22 at 8.20.25 PM

Please give credit to Matt Miller and me if you use this idea. It has been a fabulous learning experience in my classroom and I look forward to the next update!


Chromebook, Geometry, Google Drawing, Google Forms, performance task, technology

CYOA Geometry Style

Choose Your Own Adventure was such a success in Algebra that we wanted to try it in Geometry. This served as our unit 7 assessment. We followed the same process that we did here but I did update the process so students could plan electronically using this planning form. I also had students create this in New Forms so the process is slightly different than my original post.

The biggest difference between old Forms and new Forms is inserting a page compared to new section.

Untitled drawing (4)

We also used Google Drawing so students could create their geometry problems using tangents, secants, arcs & chords. Many students had never used Google Drawing and they were very excited how nice their images looked.

Two Tangents

Students had to get 3 peer reviews, which meant a student worked through their adventure, correct and incorrect answers, then gave feedback on improvements. They used this document to guide them through the peer reviews.  The result SHOULD have been a product that met all of the requirements. Some students don’t peer edit as well as other but they learned quickly that being NICE doesn’t help you improve.

Here are a few of my favorite projects. I told them I wouldn’t publish them unless they were correct. 🙂

Journey to Pasta

Royals Rally

First Day of School

Making it to the Movies


BreakoutEDU, Google Drawing, Google Forms, Google Sites, technology, Uncategorized

Make a Digital #BreakoutEDU

They let me guest moderate a #DitchBook twitter chat last Thursday on #BreakoutEDU. It was A-Mazing! Matt Miller (@jmattmiller), author of Ditch That Textbook, has a tremendous chat at 9 PM each Thursday. The DitchBook team is very supportive and welcomed a newbie like me in without a blink of an eye. Karly Moura (@karlymoura) was so patient and supportive and co-moderated with me to make the experience wonderful. I do hope they will let me do it again sometime.

I love #BreakoutEDU for the problem-solving qualities and for encouraging perseverance. I have a Breakout box that I made. I purchased a wooden treasure chest at Michael’s and my wonderful husband but a locking hasp on it. I purchased all of my locks at Amazon or Wal-Mart, but Lowe’s and Home Depot have many to choose from also. A really awesome Date Lock was shared on #DitchBook that I need to add to my collection.

As I prepared for the chat, I knew I wanted our group to experience a digital Breakout. I had participated in a chat where we got to do one created in Google Forms and it was fun. But then I stumbled upon (thanks Sean Fahey @seanfahey another awesome #DitchBook team member) some digital breakouts created in Google Sites. THIS was what I wanted. So I set out to figure out how to do it. I’m going to share the process below. Talk about Google App Smashing! This uses Sites, Forms, Drawing & YouTube.

Look through the one I created or the links above to see how everything works before you read the tutorial below. Digital Breakout Data Cruncher

You will want to write your story and have an idea (or a list) of the links and resources that you will use. Being prepared ahead of time will make the process go more quickly.

Sites: If you plan to make a lot of these, you could have one digital BreakoutEDU site and each Breakout would be a new page within your site. That what I plan to do next, I just didn’t think through it this first time, just jumped in feet first (as usual).

BReakout Image

You want to set up your page with one column and insert a table with 2 columns. If you choose the site layout with two columns, it won’t leave enough room for your image. You will insert the Google Form into the left column and your Google Drawing in the right column when they are complete.

Layout

Drawing: Now you need to create your Drawing with invisible hotspots. Make sure you use images with Creative Commons License to modify and give credit as per the CC License. Once you have your image, create a shape on top of the image. Set the outline and fill to transparent. You can click on the invisible image and insert a link to the resource you want to use. Repeat this process for all the links in your Breakout.

This slideshow requires JavaScript.

Forms: Next you need to create the Form so participants can enter their answers. I started by inserting a video into the form with a countdown timer. BreakoutEDU has a timer you can use that’s 45 minutes, the typical breakout time, but I wanted 15 minutes for the chat so I selected one from YouTube. Next you want to set your locks. You need to validate the answer so it will only unlock with the CORRECT answer.  Here is a link to a youtube video from the digital BreakoutEDU experts Justin Birckbichler (@Mr_B_Teacher) and Mari Venturino (@MsVenturino) explaining how to set your locks to validate.

I also wanted a reward for breaking out, so I created a badge in Google Drawing, downloaded it as a .png and put the link to the image in the confirmation page.

Once your drawing and form are complete, embed them into your site. Test the game and have many others test the game to make sure it does what you intend. Once you’ve beta tested, share it with the world (or at least your class) and let them have fun.

I came up with the process on my own, but the experts mentioned above, Justin and Mari, have a page with resources to make your own. I didn’t find that page until after I’d worked through the process.  I did link to two of their videos above but there are many more nuggets of goodness on their page.

If you make a digital BreakoutEDU, please share on our crowdsourced Padlet and/or send the link on Twitter with the #DitchBook hashtag and we can beta-test for you.

Google Forms, PBL, Solving Equations

Choose Your Own Adventure Project with Google Forms

You know when you find a project and you think, “This could be a fun project that my students could benefit from”, and then you get the results from your students and it was a flop?  Well this isn’t that type of project.  I was blown away by some of the stories my students created.  I don’t have all of them listed below because they have to correct their mistakes before I will publish them, but they can keep correcting until it’s ready for the public eye.  Check back, I’ll add more as they become available.

Mage Example

I can’t take all the credit for this project. The original idea came from @jmattmiller in his book Ditch That Textbook.  I did make the scoring guide and the planning sheet to help students create this. Matt also has a video on his site that would be a good resource also.

Now Matt teaches Spanish and I teach Math, but the basic idea of Choose Your Own Adventure is present and could be adapted for any content area.  My students had to have 5 equations, a good story line, images, & explanations of misconceptions if a player choose the wrong answer. We started by writing the story on the planning pages.  It’s a lot easer to type this into Google Forms if you already have your story and equations in place on the planning page. I also included instructions about how to enter the information into forms on the back of the planning pages.

My scoring guide is based on our SBL. Our non-math standards include Quality of Work, Completeness of Work and Timeliness, basic skills an employer would want. We also assess based on our Math standards from our curriculum.  You may take my scoring guide and adjust it to fit your curriculum.

I have the Docs set up to make a copy when you click on them.

Planning Page

Scoring Guide

Now for some awesomeness.  (Disclaimer – some didn’t follow copyright and snagged images from Google.  We did talk about this but some chose the easier path)

Journey to Be A Mage (all images drawn by student)

Treasure Map (in the Spirit of TLAP – @burgessdave would love this one)

Cookie Recipe

Lost on an Island

The Safari

The Theory of Rock