Digital Escape Rooms, Distance Learning, formative assessment, Geometry, Google Sheets

Fun with Google Sheets – Part 3

It’s been a minute since we had a fun with Google Sheets so I decided to bring you another installment as school is starting or getting ready start for most of us.

Separate Names

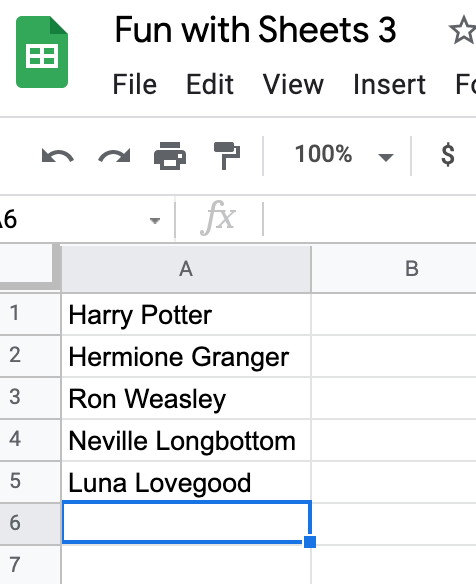
I like to copy the names of my students from my gradebook screen or download an Excel file of students from our grade management system (we use PowerSchool). This copies first and last names but sometimes I just need first names. I DON’T want to go through a delete all of the names, especially since I usually have around 150 students.

Never fear, Google Sheets are here! You can EASILY separate the names into two columns.

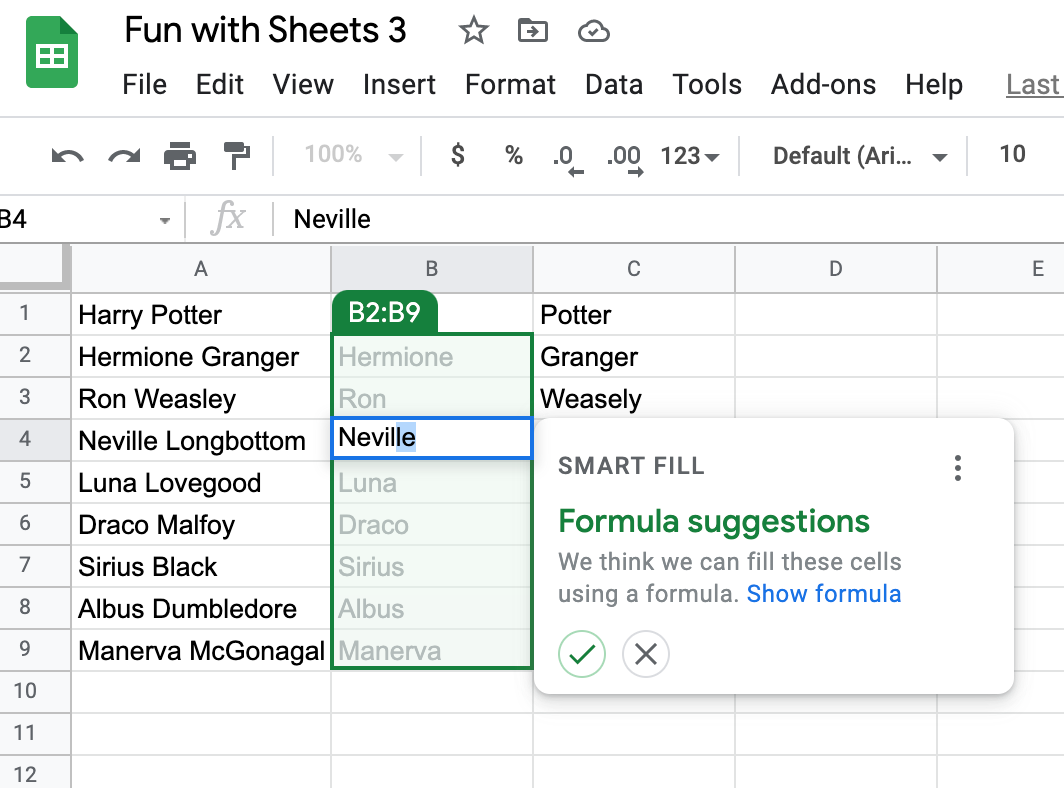
Begin by typing the names into two columns, just as you want them to appear. It may take a few names, but once Google Sheets understands what you are doing, Smart Fill will pop up a suggestion. Click the checkmark and Sheets will do the rest.

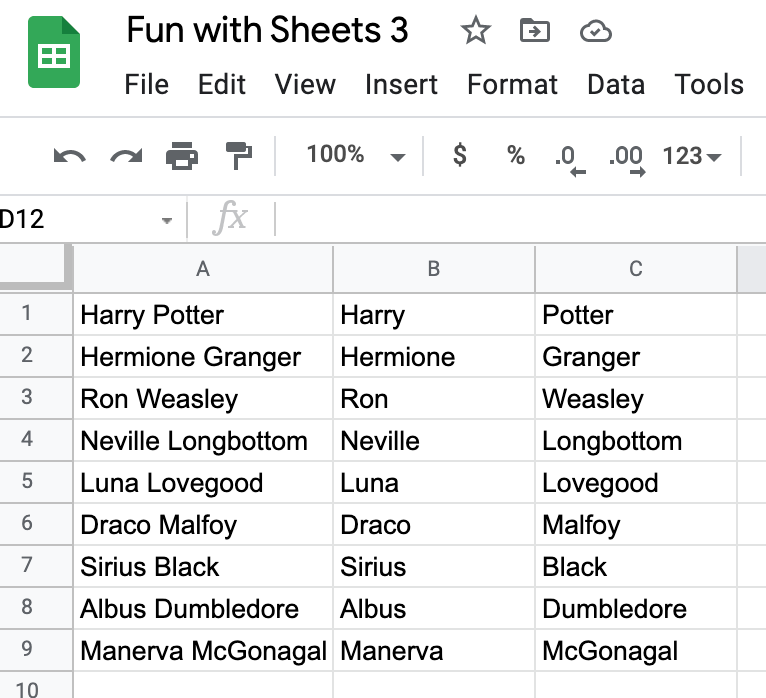
You will do the same for the last name column. Then you have the entire sheet broken into first and last names. YAY! Such a time saver.

The process also works in reverse. So if you have first and last names in two columns, you can type both in the third column and smart fill will recognize the pattern and fill for you.

Google Translate

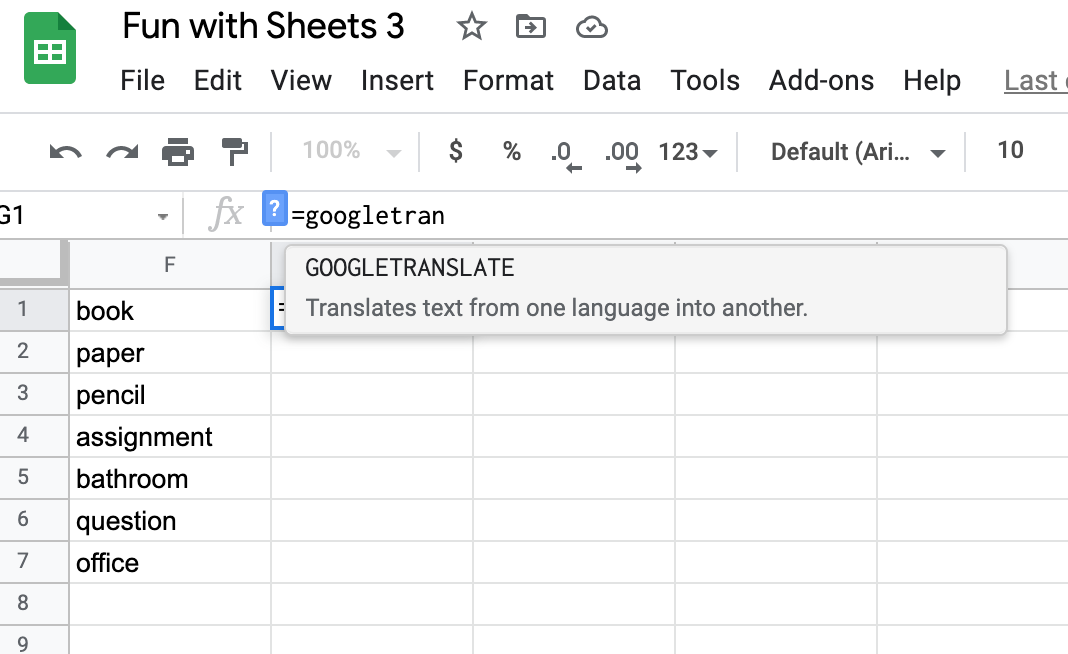
You can translate a list of words in Google Sheets. Type the list of words in one column. In the next column, type =googletranslate and and prompt will appear.

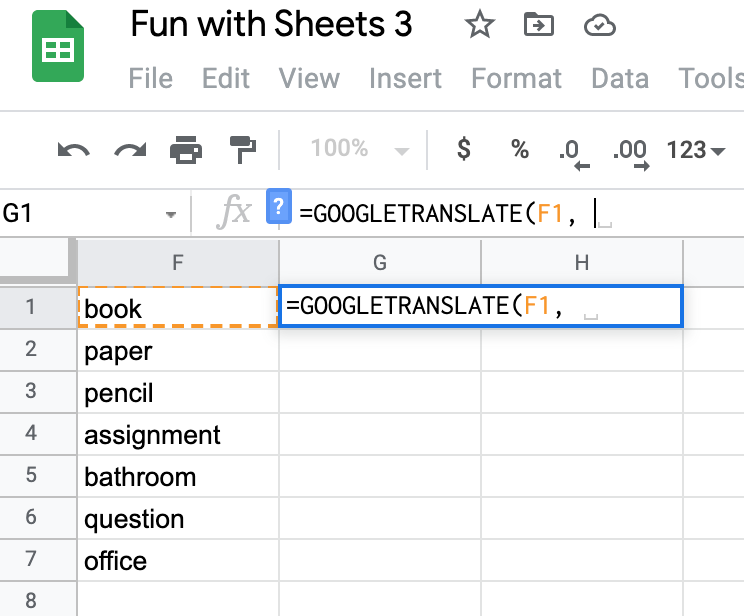
Next you want to click on the cell for the word you want to translate. Don’t worry, we don’t have to do this for every word, it will fill all of them in the end. It will place this cell into the formula, then put a comma and “auto” then a comma.

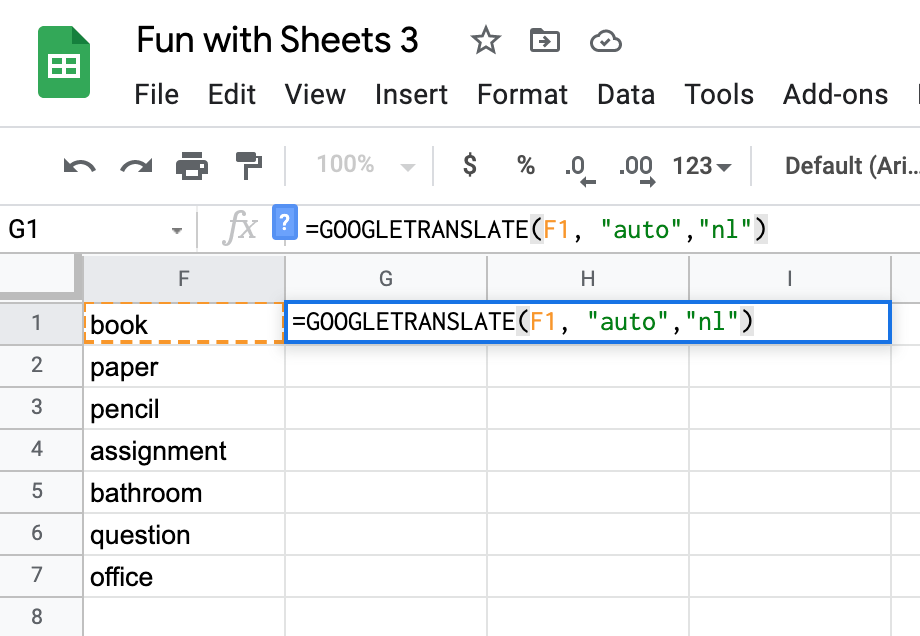
Now you need to find your two letter language code. These are called ISO codes and you can do a google search for them. Here is a link to the site I use. I’m translating to Dutch which is the code nl. So I will add the code in quotations and then close the parentheses.

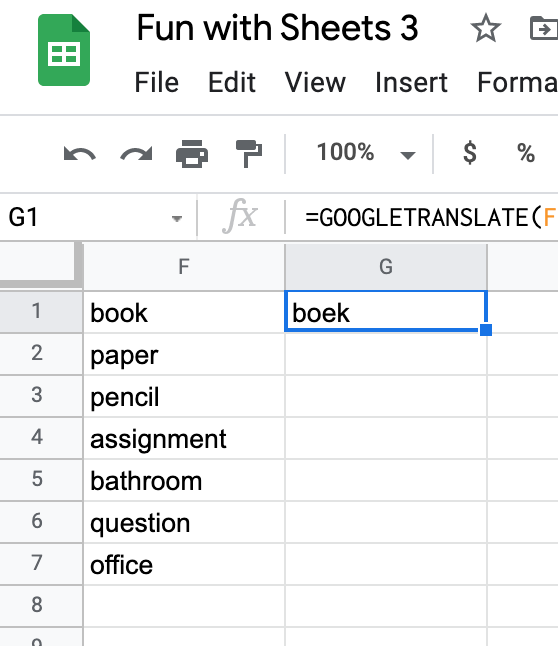
One word is translated.

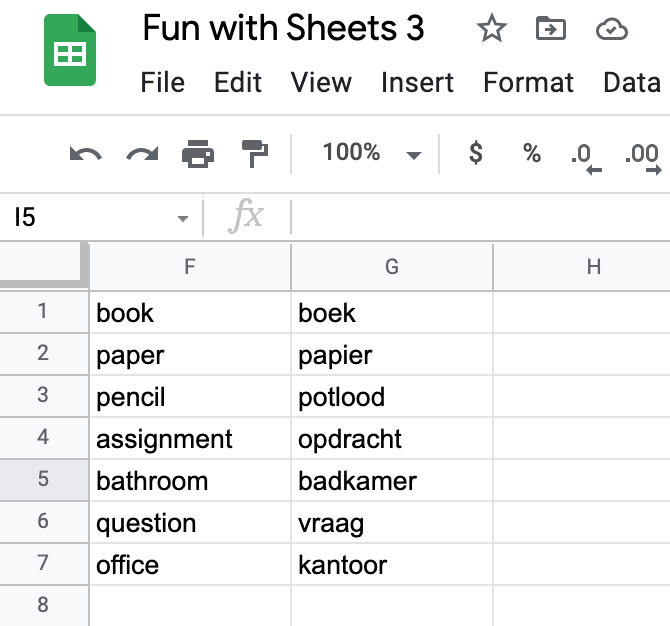
Now grab the blue box in the bottom right corner of that cell and drag down. You have translated all of the words.

Hiding Answers

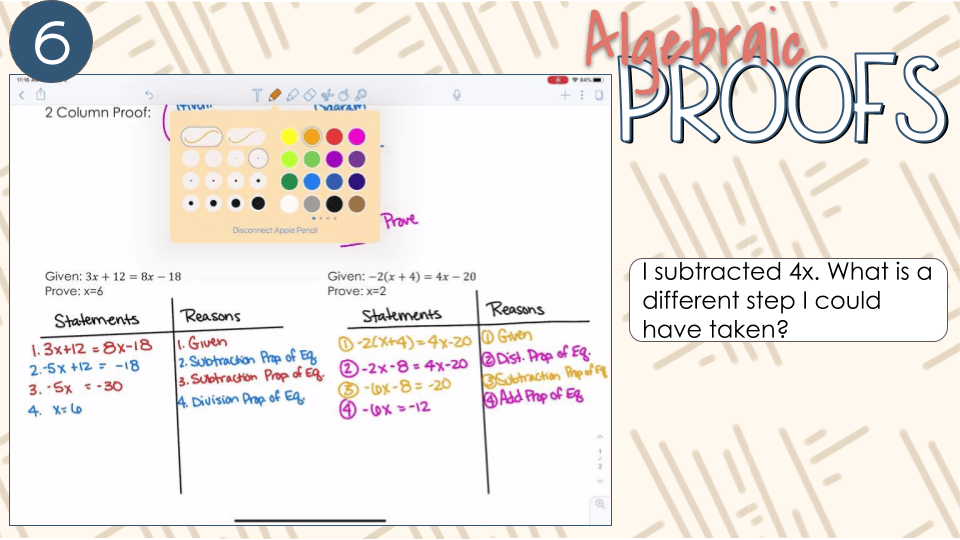
I love to create interactive Google Slides for review games and escape room tasks. Most of the time the game works as it should. But every now and then a student figures out that you can click on the input box to see the answer. And, OF COURSE, they tell the rest of the class and now they are just entering the answer and not working out the problems.

Here is an example of a pixel art activity where this could be used. Many of mine have not been updated to this cell reference method but I will be updating them as I use them this year.

In this example, the student can see that typing 18.1 into D3 will give them the correct answer.

You can make this process more difficult for them. Using sheet 2 (click the + sign next to sheet 1 in the bottom row), you can type the answers into cells and then reference these cells on sheet 1.

I started in T33 to type my answers so it wasn’t on the screen if students click Sheet 2. You can also hide this sheet or password protect it so students can’t see it. If you do that, then just begin in A1 with your answers.

Replace 18.1 with Sheet2! followed by the cell where the answer is located, T33 for this example.

Now when a student clicks on the answers, they would have to unhide (if it’s not password protected) Sheet 2 then find T33 for the answer. I don’t usually password protect and it still deters most students.

Well, I hope you enjoyed this episode of Fun with Google Sheets and I hope you have a great start to your year!

App, Distance Learning, technology

Scanning Apps for Remote Learning

This is a post for my remote teaching friends or even my friends who are in person but don’t want to touch papers. It’s a scary time we live in and the less we touch the better.

During emergency remote learning in the Spring, I had students send me images of their work. Many of them were HORRIBLE. They would send a picture taken from the side with mostly their bed and pillows in the background, dark or blurry pictures that you couldn’t read, or the HEIC image format that couldn’t be uploaded.

I didn’t want a repeat of the spring so I did some research and found Apps that would work on most phones. I created tutorials for each and I also screen shared my phone during Zoom sessions and demonstrated how to use these apps.

Reasons to Scan vs. send pictures:

  1. You get a better image and you can pick PDF or .jpg (in Genius Scan)
  2. You can crop out the background
  3. You can email it or save it to your Google Drive or OneDrive
  4. You only get one file and not 3 separate submissions from students

Notes App (iPhones)

This app is standard on the iPhone. It will only save as a PDF but you can choose color or black and white.

Genius Scan

I have been using this app for a few years now. I LOVE this app and have shared it with my colleagues. You can send the image as a PDF or .jpg and it’s available for free on iOs or Android. I still use this app even though Notes will now scan.

I created a tutorial slide for my students with some additional information. The template is from SlidesMania (of course!). Feel free to use it with your students if you find it helpful.

click for template

I shared the scanning idea on Twitter the other day and received a lot of requests for more information. I though a blog post would be the best. Hopefully it helps make remote learning a little better for you.

Stay safe friends!

Distance Learning, EdPuzzle, Google Forms, Google Slides, Virtual Learning

Interactive Video (Ed-Puzzle Hack)

I LOVE EDPUZZLE! It’s a quick way to help students engage in a video they are watching. It’s also great for virtual learning. What I don’t love about EdPuzzle is the limitations in the free version. You only get 20 free videos. That will get me through, MAYBE, my first 2 units. You can refer people to EdPuzzle to get more, but who has time for that?

If your district will pay for the PRO version of EdPuzzle, DO IT! Most districts, however, are not in a financial situation to do this. So, I’ve created a HACK to have an EdPuzzle like experience. You can use it IN the classroom or during VIRTUAL learning.

Pros and Cons of my Hack–Pro, it’s free! Con, you can’t prevent students from moving ahead a slide to see the answer.

So here we go… I have two different approaches for you.

Google Slides

You can trim videos INSIDE Google Slides. Just insert your video. When you click on it (not the play button, but the video itself) you will get a Format Slide button right above the slide. Click on it and it will open a menu to the right. You can set the start and stop time for this video clip.

Put your question and answer box on the slide.

I duplicate the slide, and set my start time on the next slide exactly where I left off on this one before. The I watch the video and pause when I want to stop. You can click the button “use current time” to set it that point. Change your question for the new slide.

Keep going until you have each slide set for each question you want to ask.

This is the type of slide activity that you use NOT IN PRESENT MODE. You will also want to set it in Google Classroom to make a copy for each student. They will submit their completed Google Slide when they are finished.

Click here to get the template of my activity.

Slides + Forms

The drawback to JUST using the Google Slide is having to open each student to see their responses. I with we could clip videos in Google Forms, but we can’t, so here is my solution.

Create your Google Slide JUST LIKE I DID for OPTION 1. I just left the questions off.

Now, I’m going to create a Google Form to accept the answers.

If you have never used Tab Scissor and Tab Glue, you’ve been missing out. If you have your tabs open side by side and click Tab Scissors, it will open the tabs in two equal windows. When you are finished, click tab glue and it puts it back together.

This way students can see the video and question at the same time. You can also hit present to make it full size and when you hit ESC it goes back to the split screen.

To recap, if you need less than 20 videos, use EdPuzzle. If your district will pay for the Pro version, use EdPuzzle. If neither of those work for you, use this Hack.

Let me know if you use this. Shoutout on Twitter, Instagram, or Facebook at tag #MMNS and #infinitelyteaching!!!\

Happy Creating.

Bitmoji, Distance Learning, Google Forms, Google Sheets, Relationships

Get to Know Your Students

Relationships are so very important. If you want to connect with your students, you need to know your students and they need to know you and each other. I try to build a climate and culture in my classroom of family. I want it to be a safe space to learn, fail, share, and grow. Students will never feel comfortable doing this if they don’t know each other.

Here are a few activities I’ve done to help us get to know one another and create that family climate.

Google Form Survey

This document does more than gather information. I play a game at the of class periods that run a little short. See, if my students get done early, they pack up and migrate toward the door. This is problematic because so many students clustered around the door causes issues (and our administration has made it an expectation to NOT line up at the door). I will open the spreadsheet from this form and play guess who. Now let’s use some common sense here! I do ask students some personal information like internet access and food allergies. DO NOT USE THIS INFORMATION for guess who. I know you won’t but I’m putting it out there JUST in case. Students love to play this game and they get to know each other a little as we go. It also keeps them in their seat and engaged until the bell rings. This Google Form idea came from Jennifer Gonzalez. I found it in this blog post with many other great ideas including ice breakers. The guess who game idea came from a retired administrator I had during my specialist classes.

Collaborative Slides

I have been using this slide activity for quite a few years now. I like it because we learn about each other the very first day but I can also teach students how to use Google Slides, a tool we use OFTEN in my class. I assign it through Google Classroom and every student has access to the SAME document. This means you need to make a copy for each class. I forgot once and had to make a copy of the completed activity and delete the slides the students had added. Not a complete disaster but wasted time. I post this activity at the TOP of Google Classroom so students can access it any time. I also make sure any new students who join us later in the year complete it (same with the Google Form).

A NEW Collaborative Slide

This is a NEW collaborative slide idea I saw on Twitter. Pamela Bradley (@4pambradley) shared on behalf of Lauren Vining. I LOVED IT, and not just because it had a Bitmoji (I give other options BTW). I wanted the lockers to be a little bigger and I wasn’t sure about the copyright of the locker image used so I made my own version in Google Slides. I plan to have the students use this activity just like I did the previous one. I will also get to introduce remove.bg and unscreen.com to remove the background from images and animated gifs. This way they can add a picture of themself if they want.

All of these activities (except or guess who, and maybe even that one via Meet or Zoom) could be used for virtual learning too.

Now, go build those relationships!

digital whiteboard, Distance Learning, Google Slides, PowerPoint, Uncategorized

Free Collaborative Whiteboard Space

I had a teacher email me earlier this week and ask for free solutions to a collaborative whiteboard he could use with Zoom so students could graph but not have to share their screen. There are some cool apps out there like AWW app and Bitpaper. Both of these are amazing, but they also charge a monthly fee. Most of us can’t do that. So you know the old saying, necessity breeds invention.

Here’s a little Schoolhouse Rock video if you need the inspiration:

Ok, to the real meat and potatoes of this post. I suggested he use a collaborative Google Slide and the scribble and line tools or a collaborative PowerPoint365 and the drawing tools. He can share the collaborative slide on Zoom while the student drawing is accessing the “whiteboard” on their computer. Our students are more familiar with Slides, but PowerPoint (sorry Google) does a better job with drawing tools.

Screen Shot 2020-03-27 at 12.10.49 PM
Slides Scribble Tool

Screen Shot 2020-03-27 at 12.11.28 PM
PowerPoint Drawing Tool

Slides worked very well for graphs, not as easy for writing (I suggest the text tool)! PowerPoint was awesome for writing but there was a big delay with the image appearing on the shared screen.

You can set the graph as the background so it doesn’t move when students are graphing. I’ve included a little infographic on this process for Slides & PowerPoint.

Set an Image as Background infographic SlidesSet an Image as Background infographic PPT

Another colleague of mine likes to send her kids to the whiteboards every day as a warm-up. Well, using this, it would work the same. You could use it over Zoom (or Meet) but you wouldn’t have to. The cool thing is, it serves the same purpose. Students can look around (on other slides) if they need inspiration and the teacher can give immediate feedback.

Just thought I’d share this little hack we discovered this week.

Stay safe friends!

Distance Learning, Notability, Screencast, Tutorial

Notability and Distance Learning

Those of you who know me know I have been a Notability fan for at least 8 years. I love it. It has improved significantly since I started using it and every upgrade makes me love it even more.

During this crazy time of distance learning, Notability and your iPad can be a welcome help. You can create notes that can easily be shared in Google Classroom. You can screen cast and save to Google Drive to be shared in Google Classroom. If you download Zoom, you can use Notability and share your screen and give notes live.

I have created a few videos to help you navigate and efficiently use Notability on your iPad. This includes backing it up to Google Drive, screencasting, and some basic use.

I don’t have a tutorial for Zoom, but I will work on it and get that added here as well.

Notability is not free. Right now it’s $8.99. I’m telling you it’s worth every penny you spend. They do have volume discounts of 50% off for purchases of 20 copies or more at one time.

Please let me know if you have questions about Notability or if there are additional tutorials you would like to see.

Set up Download and Sync to get your files to Notability faster.

Set up a Folder to make importing to Notability easier

Set up and basic use of Notability

Connect Notability to Google Drive to import and backup

Open a file from Google Drive

Screenrecord on iPad with Notability