I stumbled upon this post on Twitter this past week about an Escape Room puzzle idea. You know how much I LOVE making escape rooms so I thought I give it a try. WOW! What a cool idea.
His name is Jason Pullano and you should give him a follow on (my favorite social media) Twitter. I didn’t alter this in any way other than to change colors to match my theme. His template is FIRE (to quote my daughter) and his video is very helpful if you are not sure what to do.
This is the link to the template he shared on Twitter.
I have been a fan of John Meehan since he wrote a guest blog post on Ditch That Textbook. His book EdRenaline Rush is also amazing! He is a very helpful, kind, giving educator that you should definitely follow on Twitter.
This is an activity he posted last year and again this year. Many people have taken his idea and put a spin on it. Here is mine, along with some resources I use. Full credit goes to John. I’m so glad he is part of my PLN!!!
We will begin remotely this year, not because of Covid but because of an “air-quality” issue in our building, resulting in a complete gut our our building. All of our books, resources, supplies, decorations, etc. were thrown in the trash. 😦 That was 20 years of memories gone. The good news is when we return, our building will be safe for staff and students (well Covid safety measures will still be in place!!!).
Since I will start virtually, this activity is set up for remote students. John has his set up for in-person OR virtual.
This is a different syllabus template I’ve used in the past. You can also change the background color.
I know this seems like more work that just printing your syllabus, but imagine the excitement for your students to explore and learn about your class in a fun way and not just listen to you as you explain your syllabus.
If you make one of these, please tweet out to John @MeehanEDU and me @MandiTolenEDU. We would LOVE!!!!! to see them.
Most of the content in this post is similar to the original post. You can view it here. I’ve learned a little since I created that first post so now the process is better and it’s possible to update the content once you make. If you don’t want to create your own from scratch, Matt Meyer (@54Mr_Meyer) has created templates that are available on Slides Mania.
I REALLY dislike cutting out paper activities. This dislike is what prompted me to create my first activity (drag and drop Geometry Proofs) with technology. When my team found a fun Memory Game activity I CRINGED at the thought of cutting out all of those sets and then finding a place to store them.
I went through a few attempts to create a memory game in Google Slides. I thought about linking pages but I needed to see two at a time. I wanted to remove one element “on click” but I could only get them to dissolve in a specific order. I settled on deleting the cards and it worked like a charm.
I know, you are all wanting to create your own memory game now! You’re in luck, I have a quick tutorial for you!
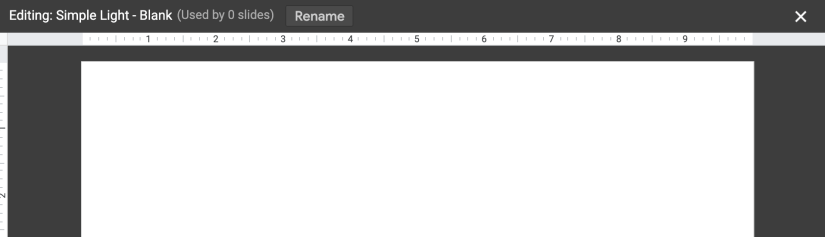
We are going to use the Master Slides to create our content (the back of the cards). This will prevent the movement of the content when players remove the top card. Using the Master Slides will also make editing possible should you wish to change this activity in the future. The way I suggested to do this before would not allow that.
Here is how to access Master Slides. You will scroll to the bottom and use the blank slide.
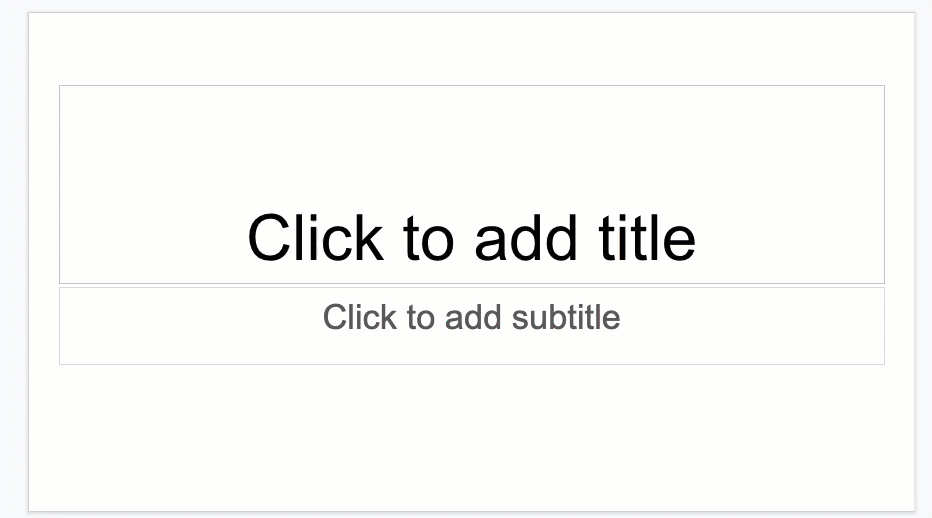
I used the basic white background so it didn’t distract from game. Place all of the “back side” of the cards, the part with the content, evenly spaced on your Master Slide. I ended up putting boxes around mine to help me get them spaced. I love that Google Slides give you guide lines as you place your items.
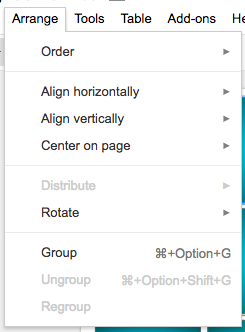
You can also use the arrange menu and select horizontal or vertical and align them perfectly.
Now we will close the Master Slides menu by clicking the x in the top right corner.
Once Master Slides closes, you should see your blank slide. You can right click (two finger click) on the blank slide and Apply Layout, selecting the layout with your content. You should now see your content you created earlier displayed in the slide.
We are ready to make the cards. I used the rectangle shape and held down the SHIFT key to make sure I had perfect squares.
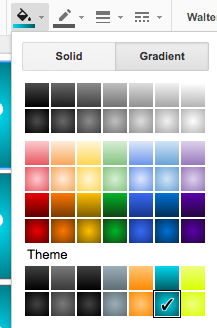
I used the gradient tool to select the background and put a ? on it just like the original memory game.
One suggestion from my students was to make this an image so the ? wasn’t editable. Sometimes when clicking on the square they got the ? instead.
You could make these cards in Google Drawing and download it as a PNG to use in the game.
You can copy and paste these and use the align tool again to get them close to where you want them. Then move them exactly where you need them.
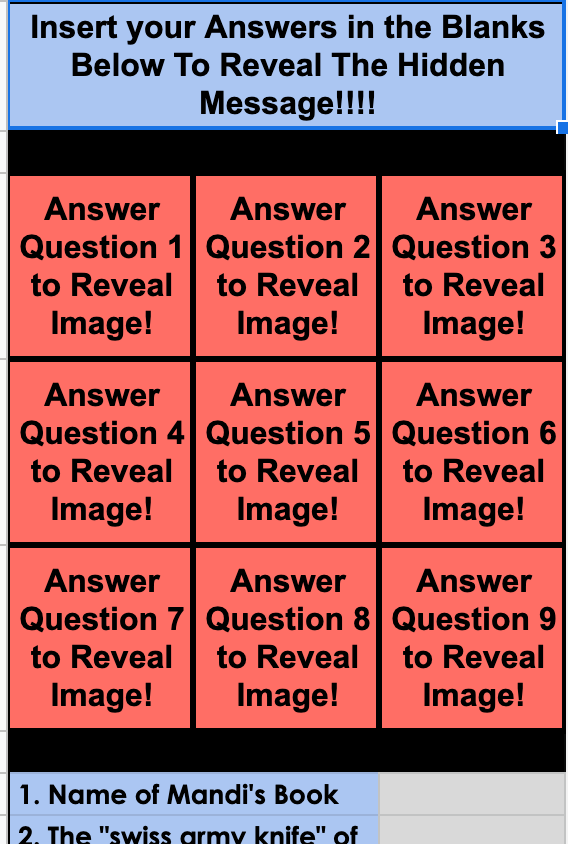
Create the rules page. I’ve included the image of my rules page below. It explains how you would “flip” the cards over to play the game.
A question I get a lot is how to flip over the cards. You aren’t REALLY flipping over the cards, you are deleting the cards to reveal the content behind it. You delete 2 cards. If they are a match they remain deleted. If they are NOT a match, you undo twice using control Z or the UNDO arrow and the next person takes their turn.
Play the game!
I sent this to my students through Google Classroom and said make a copy for each student. They enjoyed it and learned from the activity as well.
If you make a memory game, please share! I love to see how people use my ideas.
Tag me on Twitter @MandiTolenEDU and use the #infinitelyteaching. If you want to use Matt’s template, head over to SlidesMania and snag it.
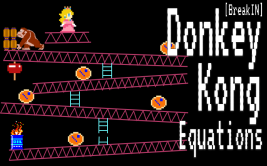
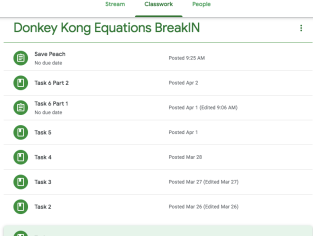
Matt Miller had a guest post on his blog a while back by John Meehan on a game concept called QR BreakIN [*update: John’s book EDrenaline Rush is available]. I love to create BreakOUT games so this idea had me intrigued. John’s graphics were amazing and the game boards looked fun. I pondered how to use it in my math classroom for quite a while until an idea finally surfaced.
A few areas had me stumped. 1. I needed the tasks to be sequential and most games boards where you roll dice are random. 2. I didn’t think, unless it was a review day, I could accomplish much in our 45 minute class period using his format.
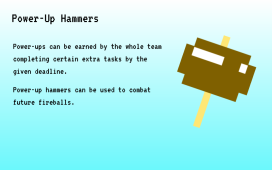
I used John’s template but with my own twists. I came up with the Donkey Kong idea because jumping the barrels creates the progression of tasks that I needed. I also made this a unit long game instead of one day. Reading more information on John’s blog, I found a post he had about Power-Ups, so I incorporated that into this game too.
Since the game would be completed over 2 weeks, I made my game board and game pieces electronic. I also wanted to use Google Classroom to release the tasks instead of using QR codes, mainly because our student laptops aren’t the best and they don’t play nice with QR readers.
Here are my takeaways from this unit long game.
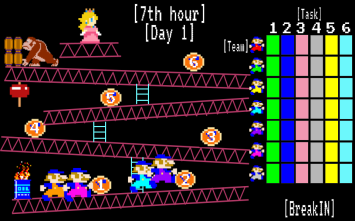
Game Board
I like that I can open the slide from day to day and update the progress of the game instead of moving it from the board and putting it back for each class daily (I did this in 3 classes). However, I felt like it took me longer than I wanted to get the board updated because I was checking and releasing tasks.
Narrator Cards
GENIUS! I gave my students 3 for the unit. The cards could be used to ask a content question of the Narrator. You know what happened? They asked each other instead, just as I had hoped. We are nearing the end of the unit and NO ONE has used a card. They have worked together as a team to find solutions.
Google Classroom instead of QR codes
This one was tricky for me because of the time issue. I did load each post ahead of time as a draft and then I could release to each group as they were ready. This still took more time than I wanted to spend. It would be much simpler to have the QR codes, but I also like that the tasks are still in Google Classroom if they want to reference them.
Student motivation
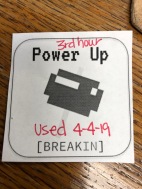
Wow, kids are serious about earning Power-Ups. If a student did not complete their practice, the team was ALL OVER THEM. I had more practice completed this unit than ever before. Students were also, mostly, positive in their encouragement of their team.
Would I do this again? YES. This has been a fun way to present a short and mostly review unit for my students. They seem to be enjoying it.
Check out the hashtag #QRBreakIN on Twitter and also lurk around John’s blog. He does some amazing things with students.


 I went through a few attempts to create a memory game in Google Slides. I thought about linking pages but I needed to see two at a time. I wanted to remove one element “on click” but I could only get them to dissolve in a specific order. I settled on deleting the cards and it worked like a charm.
 We are going to use the Master Slides to create our content (the back of the cards). This will prevent the movement of the content when players remove the top card. Using the Master Slides will also make editing possible should you wish to change this activity in the future. The way I suggested to do this before would not allow that.

 We are ready to make the cards. I used the rectangle shape and held down the SHIFT key to make sure I had perfect squares.
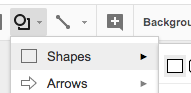
 One suggestion from my students was to make this an image so the ? wasn’t editable. Sometimes when clicking on the square they got the ? instead.
  Create the rules page. I’ve included the image of my rules page below. It explains how you would “flip” the cards over to play the game.
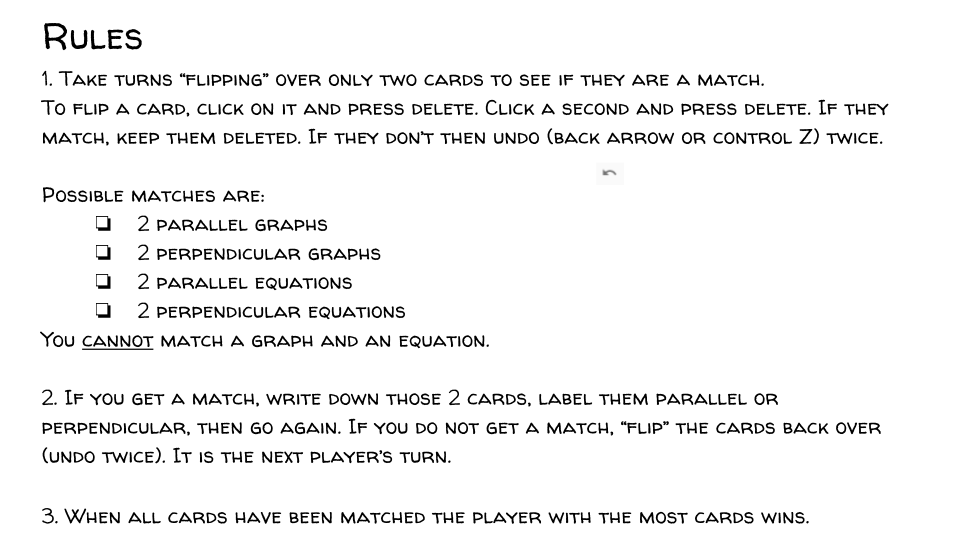
 Play the game!