ISTE2016, sketchnotes

ISTE 2016

#ISTE2016 was three weeks ago. It was my first ISTE and hopefully not my last. I met so many new people, learned so many new things, met so many Twitter friends, learned so many new things… Oh wait, I’m repeating myself. The experience was a whirlwind and SO WORTH IT!  Rather than type the whole experience, I made a sketchnote of just a few of the things that stick out in my mind. I didn’t put anything on there about the WONDERFUL poster sessions, or reference ALL of the people I met (John Bergman who created flipped classroom), or note all of the sessions I attended, but I tried to capture the moment in a sketchnote (which I did learn a lot more about at ISTE)

ISTE 2016.png

Meeting Matt Miller and Alice Keeler was at the top of my list. Matt is the author of Ditch That Textbook and he and the #ditchbook team let me moderate the Twitter chat every now and then. Our DitchBook meet up was awesome despite the CRAZY hail and flooding and I met Evan Mosier who is another regular to the chat. Ditchbook is one of the best Twitter families and PLN you could be a part of.

Alice Keeler is someone my daughter says I “Twitter stalk”. She and I share very similar opinions about educating children and she is very passionate about what she does. Not to mention, she is a genius with all things Google especially Sheets. As a result of ISTE, she asked me to collaborate with her on a Google Expedition project for math using Sheets. It’s so awesome working with her and it’s going to be an amazing activity that I can’t wait to try it out.

I plan to submit a proposal to present next year. It would be awesome to present at ISTE! At the very least, I hope I get to go again.

Until next year #iste2016…thanks for the adventure…I have so much to take back to my classroom, students, & school.

ramblings

Rethinking Failure

While at ISTE I sat in on a math mindset session. Kyle Pace (@kylepace) talked about using the motto WTF in his classroom. Now I teach high school, and I know WTF means something very different to my students than to Kyle’s. In his school it means Willing To Fail (your mind was in the same gutter with my students wasn’t it?) This is a phrase I’ve found myself adopting even though I’m still not comfortable with it.

See, failure has always had a negative connotation. Failure means that you’ve, well, FAILED. We don’t want our students to fail, we want them to succeed. In a recent Twitter chat, Brian Rozinsky (@brianrozinsky) challenged me on my thoughts about failure and sent me a link to this article by Alfie Kohn. Here is an excerpt from his article.

Thanks to its adjective, “productive failure” magically becomes a good thing by definition. (See also: “healthy competition.”) But the question is how likely it is that failure will be productive. And the answer is: Not very. The benefits of screwing up are wildly overrated. What’s most reliably associated with successful outcomes, it turns out, are prior experiences with success, not with failure. While there are exceptions, the most likely consequence of having failed at something is that children will come to see themselves as lacking competence.

While I don’t agree with all of what he says, what stuck with me was the idea that failure could be damaging, could frustrate students and make them want to quit. I’VE SEEN THIS. A student fails first semester so they quit trying second semester. A student has been a failure at math for 4 years and now they hate math and no longer feel they have the ability, nor do they have the desire to try.

So if “failure” is not what we want want to say, then maybe we just need to phrase it differently. Let’s look at the Michael Jordan failure quote:

Jordan

Before all of the talk about failing forward, productive failure, WTF, I would have read this poster and called it PERSEVERANCE.

perseverance

CONTINUED effort. I don’t think we should be focusing on failure. We should change our motto from WTF to the BIG P {keep your mind out of the gutter :-)}. When you think of perseverance, you think of success. It describes the journey to get there, which may have included some setbacks along the way a.k.a. failure.

We don’t want students putting the word failure in their vocabulary because we never want them to fail, we want them to persevere. That’s why I use Carol Dweck’s “Not yet” in my class. I show my students the video and we talk about what it means. I want them to see how they can be successful, how they can overcome obstacles, how they can persevere and learn, not fail.

So maybe it is just semantics (does anyone else always think of Lethal Weapon every time they say that word? “I’m up for some antics”-Martin Riggs). Maybe Kyle’s WTF really means willing to take risks and failing forward really means perseverance. Or maybe it’s just the educational door revolving.

perseverance (2).png

The conclusion I’ve come to is that I don’t want to discuss failure in my classroom. I want to discuss perseverance and success because this is what students should experience. Our class motto for this year will be the BIG P!

Screen Shot 2016-07-07 at 12.01.07 AM


ISTE2016, Notability, sketchnotes

Sketchnotes & ISTE2106

I’ve returned from ISTE2016 and I have so much to share but sketchnoting has consumed my brain so I’ll share this first and get back to the amazingness that was ISTE2016 in the next post (hopefully with a sketchnote to help describe the experience).

I was able to attend two sessions on sketchnotes while at ISTE.  Matt Miller @jmattmiller, author of Ditch That Textbook, the guy I talk about on this blog ALL THE TIME, had the first session. It was a great launching point and he had us make a sketchnote during Sir Ken Robinson’s Ted Talk. I SUCKED AT IT! Here’s all I was willing to post:dancer

I’ve created sketchnotes before (see here) but always AFTER a presentation has ended. This was tough! During the session I met Carrie Baughcum @heckawesome another FANTASTIC sketchnoter. AND… she was presenting later with Sylvia Duckworth and Kathy Shrock. I KNOW! MIND BLOWN!

Their session had a TON of resources & inspiration but also many examples of how students use it. Both presentations referenced brain research and how we learn better. I know this is something I want to allow my students to do. I think it will help my “doodlers” focus on my content a little more.

I wanted to practice so I found some websites to help me. The first was Sacha Chua on her blog Living an Awesome Life. This was a great beginning spot to practice. I used Notability (another favorite I mention on here often) and I tried some by hand also. Here are my practice pages.

Notability: Sketch note Practice

Next I went to the site Nuggethead where he has homework after each lesson. The lesson for day 2 was to create a sketchnote while watching a Ted Talk, one with editing and one without. Well… without editing didn’t work for me but here is the sketchnote completed. It’s from Aaron Duff’s @education_geek and his TEDx talk Hack(Ed)-disrupting the eduverse. It’s not perfect but I think I captured the essence of the talk.

Here’s my finished product: Aaron Duff TedX

Yes, that’s a ME sketch. I kind of like her. I’m excited to share this note taking option with students and I’m excited to get better at it myself. A special shout out to Matt & Carrie for inspiring me to get better!

ramblings

Google Level 2 Certification

One of the items on my summer check list was to complete my Google Level 2 Certification. After many frozen windows and a loss of over 30 minutes of testing time and a higher amount of stress than I wanted:

GCE_Badges_02

this happened! Woohoo.

ISTE is this weekend and I hope to post about what I learn and who I meet face to face (Matt Miller here I come!) Instagram is usually my personal account, but you can follow me there to see most recent pics. new-instagram-vector-logo

I still have quite a list for summer and only the month of July left. I’ll keep you posted on my progress.

Chromebook, Geometry, Google Drawing, Google Forms, performance task, technology

CYOA Geometry Style

Choose Your Own Adventure was such a success in Algebra that we wanted to try it in Geometry. This served as our unit 7 assessment. We followed the same process that we did here but I did update the process so students could plan electronically using this planning form. I also had students create this in New Forms so the process is slightly different than my original post.

The biggest difference between old Forms and new Forms is inserting a page compared to new section.

Untitled drawing (4)

We also used Google Drawing so students could create their geometry problems using tangents, secants, arcs & chords. Many students had never used Google Drawing and they were very excited how nice their images looked.

Two Tangents

Students had to get 3 peer reviews, which meant a student worked through their adventure, correct and incorrect answers, then gave feedback on improvements. They used this document to guide them through the peer reviews.  The result SHOULD have been a product that met all of the requirements. Some students don’t peer edit as well as other but they learned quickly that being NICE doesn’t help you improve.

Here are a few of my favorite projects. I told them I wouldn’t publish them unless they were correct. 🙂

Journey to Pasta

Royals Rally

First Day of School

Making it to the Movies


ramblings, Uncategorized

That’s a Wrap

That's all folks

Students left my building yesterday for summer. I have last day teacher stuff today then I leave for summer too. This is the first time in 16 years that I haven’t taught summer school, so this summer will look a little different for me. I read a tweet last night (couldn’t find it today of course to give credit) that said start planning for August in May. That’s my goal. I’m putting my list of things to accomplish on this blog to hold myself accountable. We’ll see how well I did come August.

  • Start planning more conceptual/hands-on lessons
  • Find and make some 3-Act math lesson
  • Have practice choices so students always have a choice (thanks @alicekeeler)
  • Make #hyperdocs to support my flipped classroom
  • rethink HOW I do flipped classroom
  • Create more digital #BreakoutEDU to introduce or support learning concepts.
  • Coordinate our #SJSDEdWeek
  • Present at #elevateEDU
  • Meet with some schools to help the utilize tech FOR learning
  • attend #iste2106 (WOOT!)
  • Finish reading: The Classroom Chef
  • Reread: Teach Like A Pirate, Ditch That Textbook, Drive, The Innovator’s Mindset, Fair Isn’t Always Equal
  • Read: On Your Mark, Learn Like A Pirate, Hacking Assessment
  • Enjoy my kids
  • Make a few quilts
  • Paint my bathroom

Wow, that’s a long list. Everything (except for the last 3) on that list stems from my reflection over this year and how I can improve learning for students.

Reflection:

  • Standards Based Learning was a huge success. Student’s mindset towards learning improved SO much, we had more success than ever before (and our students still came to us way below grade level). And as a side note – state scores did go up.
  • I continued the student data tracking and reflection piece and saw student ownership of their learning increase significantly.
  • I increased the amount of activities for students, some tech some not, and saw engagement increase.
  • I stopped giving homework and started allowing students to practice when they needed and how much they needed. Students started asking for more than I would ever have given them.
  • We convinced admin to allow us to continue working on semester 1 standards through semester 2 and had an additional 20 students pass.

Growth Mindset

I call this year a success and look forward to 2016-2017!

Difficulties Doing Something Right

BreakoutEDU, Google Drawing, Google Forms, Google Sites, technology, Uncategorized

Make a Digital #BreakoutEDU

They let me guest moderate a #DitchBook twitter chat last Thursday on #BreakoutEDU. It was A-Mazing! Matt Miller (@jmattmiller), author of Ditch That Textbook, has a tremendous chat at 9 PM each Thursday. The DitchBook team is very supportive and welcomed a newbie like me in without a blink of an eye. Karly Moura (@karlymoura) was so patient and supportive and co-moderated with me to make the experience wonderful. I do hope they will let me do it again sometime.

I love #BreakoutEDU for the problem-solving qualities and for encouraging perseverance. I have a Breakout box that I made. I purchased a wooden treasure chest at Michael’s and my wonderful husband but a locking hasp on it. I purchased all of my locks at Amazon or Wal-Mart, but Lowe’s and Home Depot have many to choose from also. A really awesome Date Lock was shared on #DitchBook that I need to add to my collection.

As I prepared for the chat, I knew I wanted our group to experience a digital Breakout. I had participated in a chat where we got to do one created in Google Forms and it was fun. But then I stumbled upon (thanks Sean Fahey @seanfahey another awesome #DitchBook team member) some digital breakouts created in Google Sites. THIS was what I wanted. So I set out to figure out how to do it. I’m going to share the process below. Talk about Google App Smashing! This uses Sites, Forms, Drawing & YouTube.

Look through the one I created or the links above to see how everything works before you read the tutorial below. Digital Breakout Data Cruncher

You will want to write your story and have an idea (or a list) of the links and resources that you will use. Being prepared ahead of time will make the process go more quickly.

Sites: If you plan to make a lot of these, you could have one digital BreakoutEDU site and each Breakout would be a new page within your site. That what I plan to do next, I just didn’t think through it this first time, just jumped in feet first (as usual).

BReakout Image

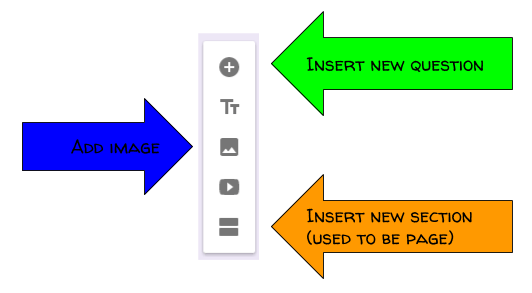
You want to set up your page with one column and insert a table with 2 columns. If you choose the site layout with two columns, it won’t leave enough room for your image. You will insert the Google Form into the left column and your Google Drawing in the right column when they are complete.

Layout

Drawing: Now you need to create your Drawing with invisible hotspots. Make sure you use images with Creative Commons License to modify and give credit as per the CC License. Once you have your image, create a shape on top of the image. Set the outline and fill to transparent. You can click on the invisible image and insert a link to the resource you want to use. Repeat this process for all the links in your Breakout.

This slideshow requires JavaScript.

Forms: Next you need to create the Form so participants can enter their answers. I started by inserting a video into the form with a countdown timer. BreakoutEDU has a timer you can use that’s 45 minutes, the typical breakout time, but I wanted 15 minutes for the chat so I selected one from YouTube. Next you want to set your locks. You need to validate the answer so it will only unlock with the CORRECT answer.  Here is a link to a youtube video from the digital BreakoutEDU experts Justin Birckbichler (@Mr_B_Teacher) and Mari Venturino (@MsVenturino) explaining how to set your locks to validate.

I also wanted a reward for breaking out, so I created a badge in Google Drawing, downloaded it as a .png and put the link to the image in the confirmation page.

Once your drawing and form are complete, embed them into your site. Test the game and have many others test the game to make sure it does what you intend. Once you’ve beta tested, share it with the world (or at least your class) and let them have fun.

I came up with the process on my own, but the experts mentioned above, Justin and Mari, have a page with resources to make your own. I didn’t find that page until after I’d worked through the process.  I did link to two of their videos above but there are many more nuggets of goodness on their page.

If you make a digital BreakoutEDU, please share on our crowdsourced Padlet and/or send the link on Twitter with the #DitchBook hashtag and we can beta-test for you.

Chromebook, Google Slides, online graphing, performance task, Uncategorized

Practicing Online Graphing

I’m sitting here watching my Algebra 1 students take the EOC, hoping that I’ve prepared them for the questions they will encounter on the test. I don’t like that we can’t see the questions to know if we have taught them the right stuff or asked the questions the right way.

One thing I do to get them ready is to have them practice graphing electronically. I created performance event type questions in Google Slides. They practice labeling each axis, dragging the dots to the grid and using the line tool to draw a line. Hopefully our practice will pay off!

I know students want to do well and teachers want to prepare them well. It’s more challenging when you have no idea what the questions will be. Good luck Algebra 1 troopers!

I’ve shared two of my performance events below. They are set to view only so make a copy. If you use it and find them helpful, please let me know.

EOC Performance Event 3       Boat Rentals Perf Event 4

Geometry, Uncategorized

Circle Vocab Picture

I don’t give vocabulary assignments very often. I usually teach it as we go in context of the lesson. Every now and then front-loading vocabulary will make lessons flow more smoothly. That’s the case with our circle unit. I can’t take credit for creating this project, but I really do like it. Students have to look up the words then create a picture with circles and label each one. Once I begin the lessons on this they are already familiar with the vocab. One student ask me today if we could do this more often, “Anytime you can color in math, it’s a good day.” We actually color in Geometry often, so I guess he has a lot of good days 🙂 I’ve listed a few examples below and then attached the Slides I gave them with more examples. Use it freely and, if you want to, let me know if you do.  I love it when others can benefit from something I already do.

This slideshow requires JavaScript.

Link to Slides for the activity prompt, vocab list and other examples.

technology, Uncategorized

GraphFree

I try not to just promote apps and websites but I found a gem for anyone wanting to create their own math content.  You know how pre-created material have those fancy official looking graphs?  With arrows at both ends! GraphFree.com is exactly what you’ve been looking for. Scatter plots for line of fit practice, one and two variable inequalities, any function… they all look good.

Why do I create my own content?  I differentiate instruction in my classroom and I’m always needing more practice for standards. This site has been amazing for creating these resources. I’ve used them in Google docs and slide activities too.  The image quality is great.

I didn’t show it on the graphs below, but you can label and number each axis. It’s very versatile.

If you try it out and like it, let me know!