animated gif, Canva, Stop Motion

Stop Motion Stickers in Canva

If you have been around my blogs for any length of time, then you know my love for digital stickers on student work. I usually create mine in Google Slides and have tutorials to do so. Did you know you can also create these stickers in Canva? Well today is the day to learn all about it.

  1. Click create a design and set your page to square. I used a 10 in by 10 in design.

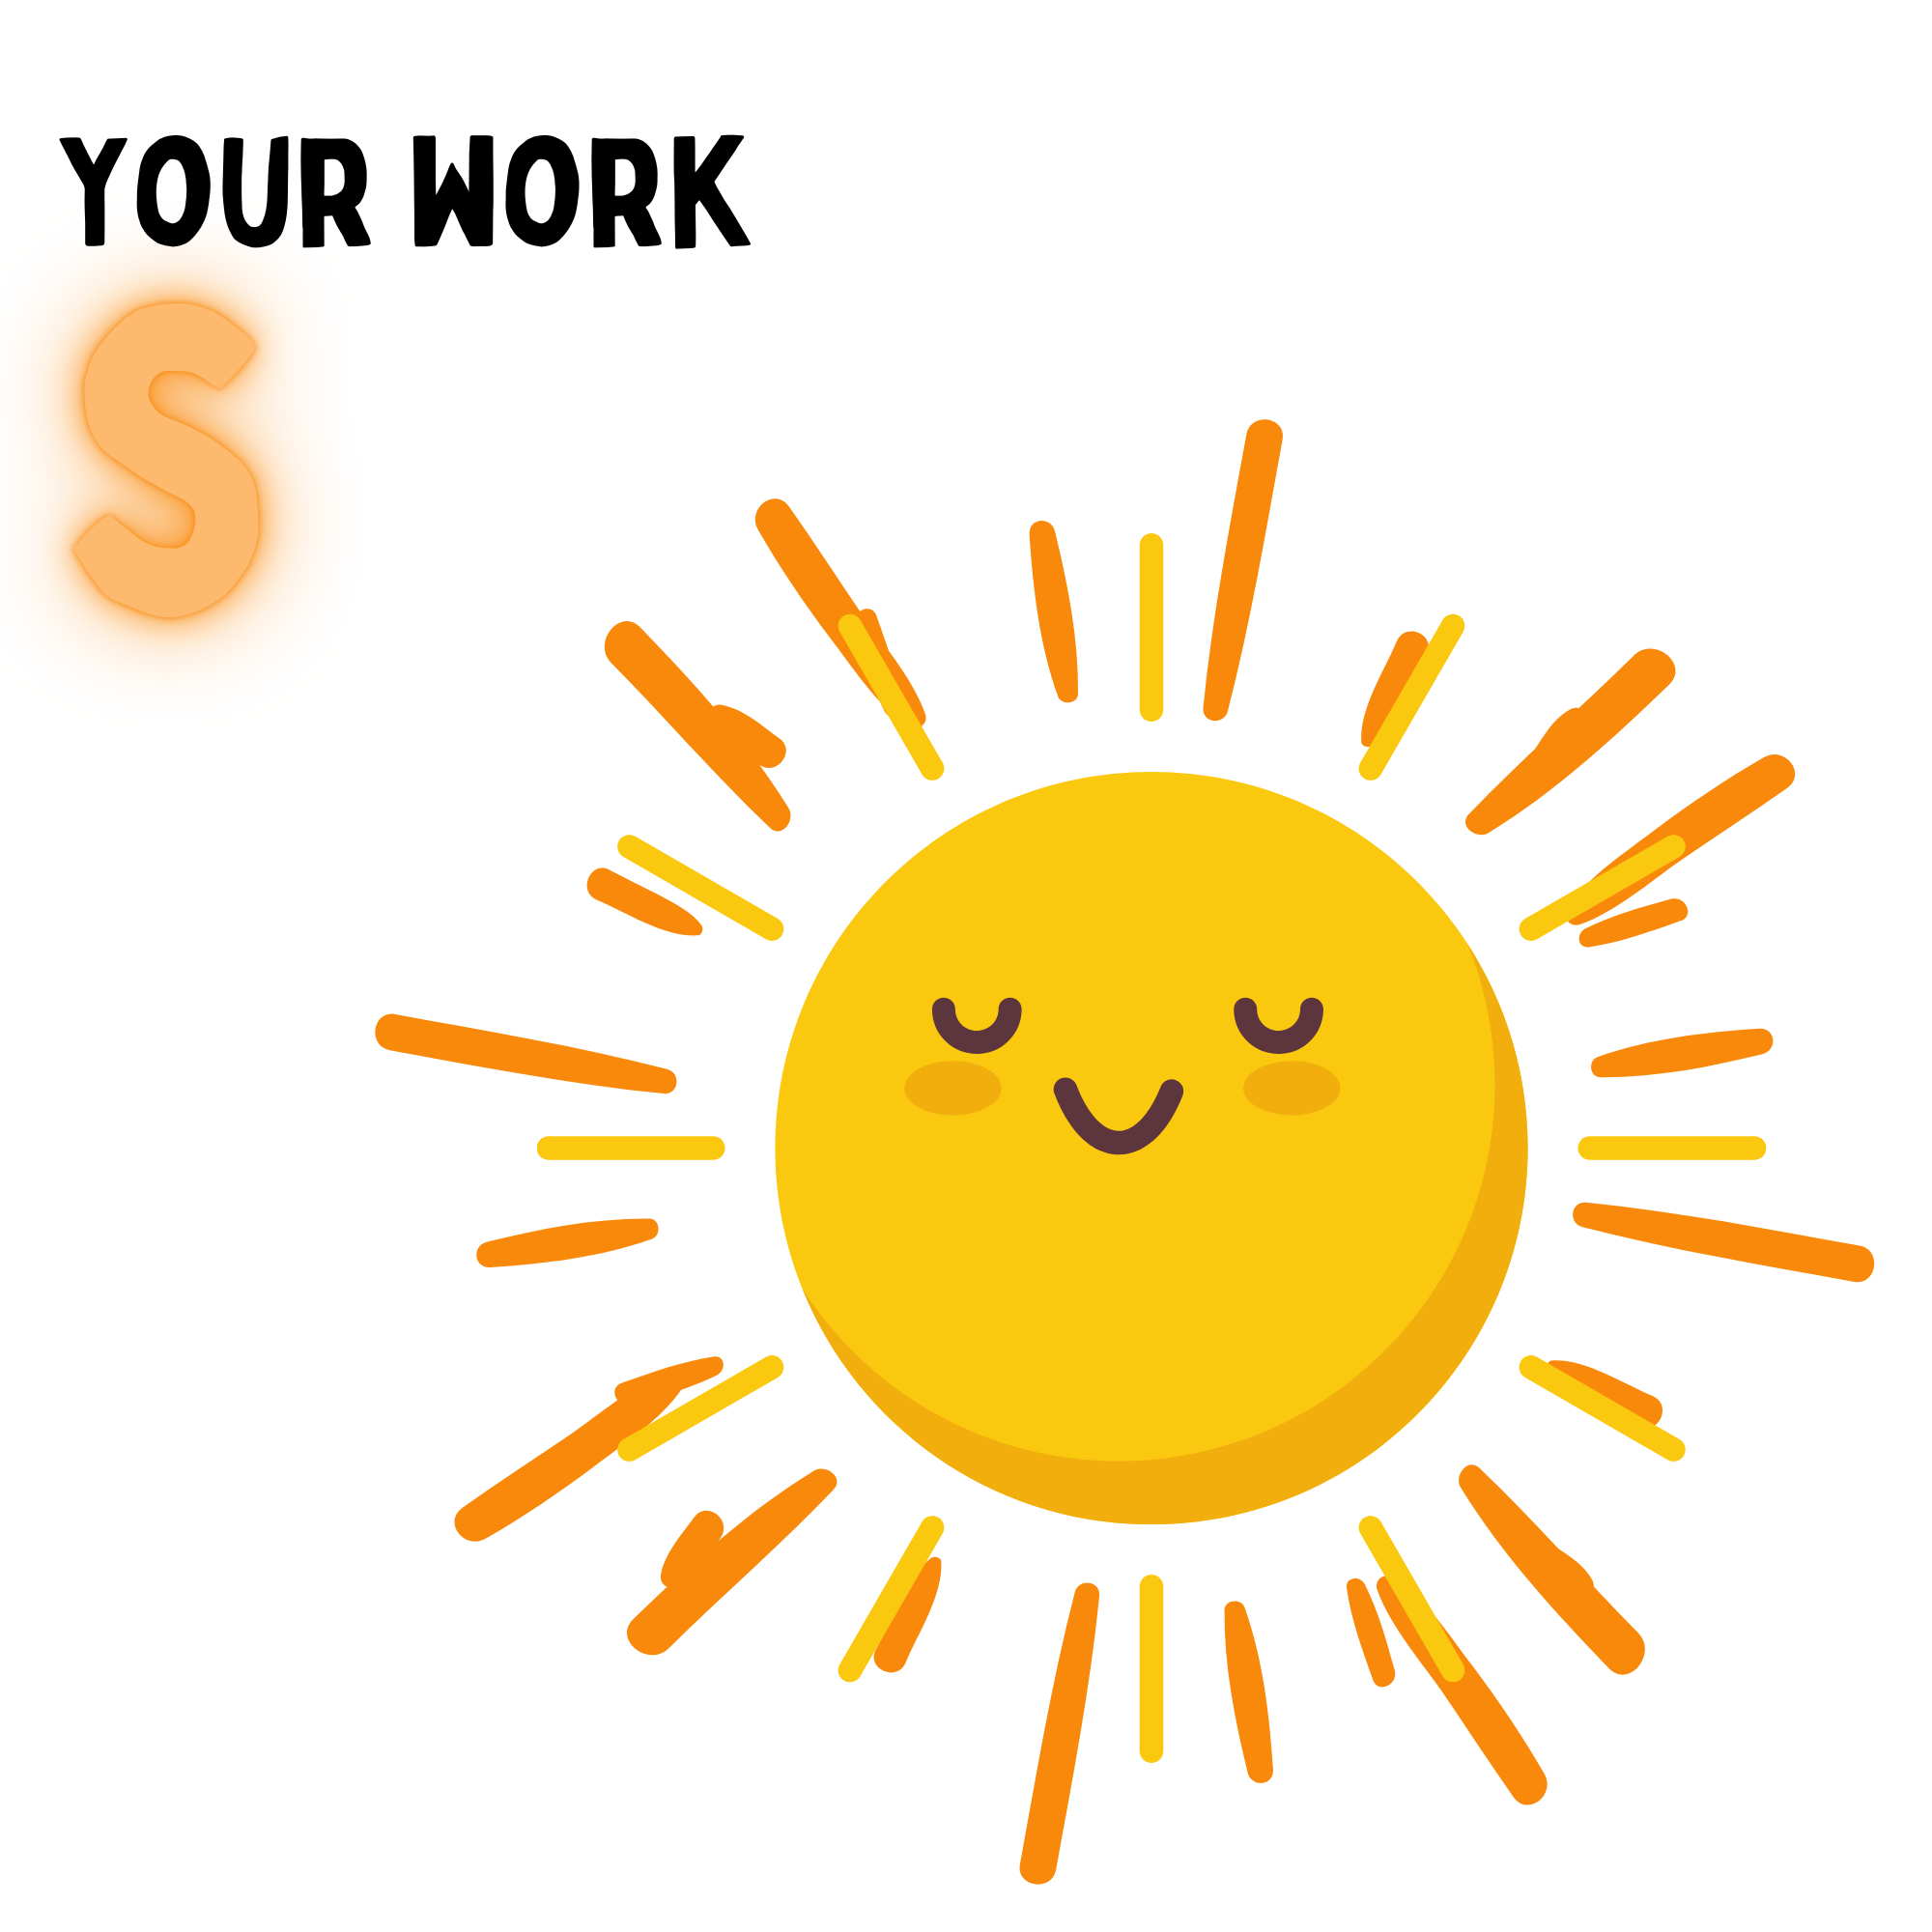
2. Next, find the elements you want to use. I picked a sun and then “shine” to get the orange pieces around it. That is the part I plan to rotate during the animation. I also want it to say, “Your work shines” so I add “Your work” with a text box.

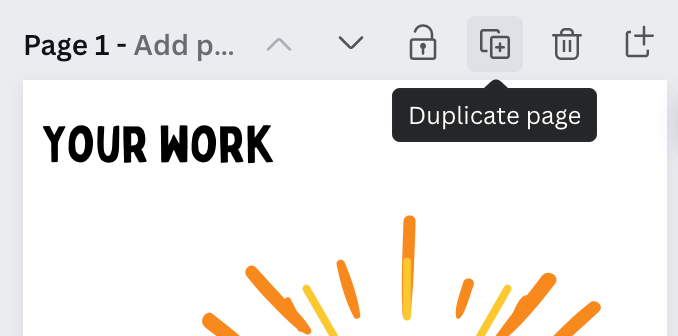
3. Now click the duplicate button on this page.

4. On this new page we will do 2 things. First, rotate the orange shine part by clicking on that element and using the rotate handle that appears. Second, I used one of the text elements and found one that looked shiny and added the S for shines.

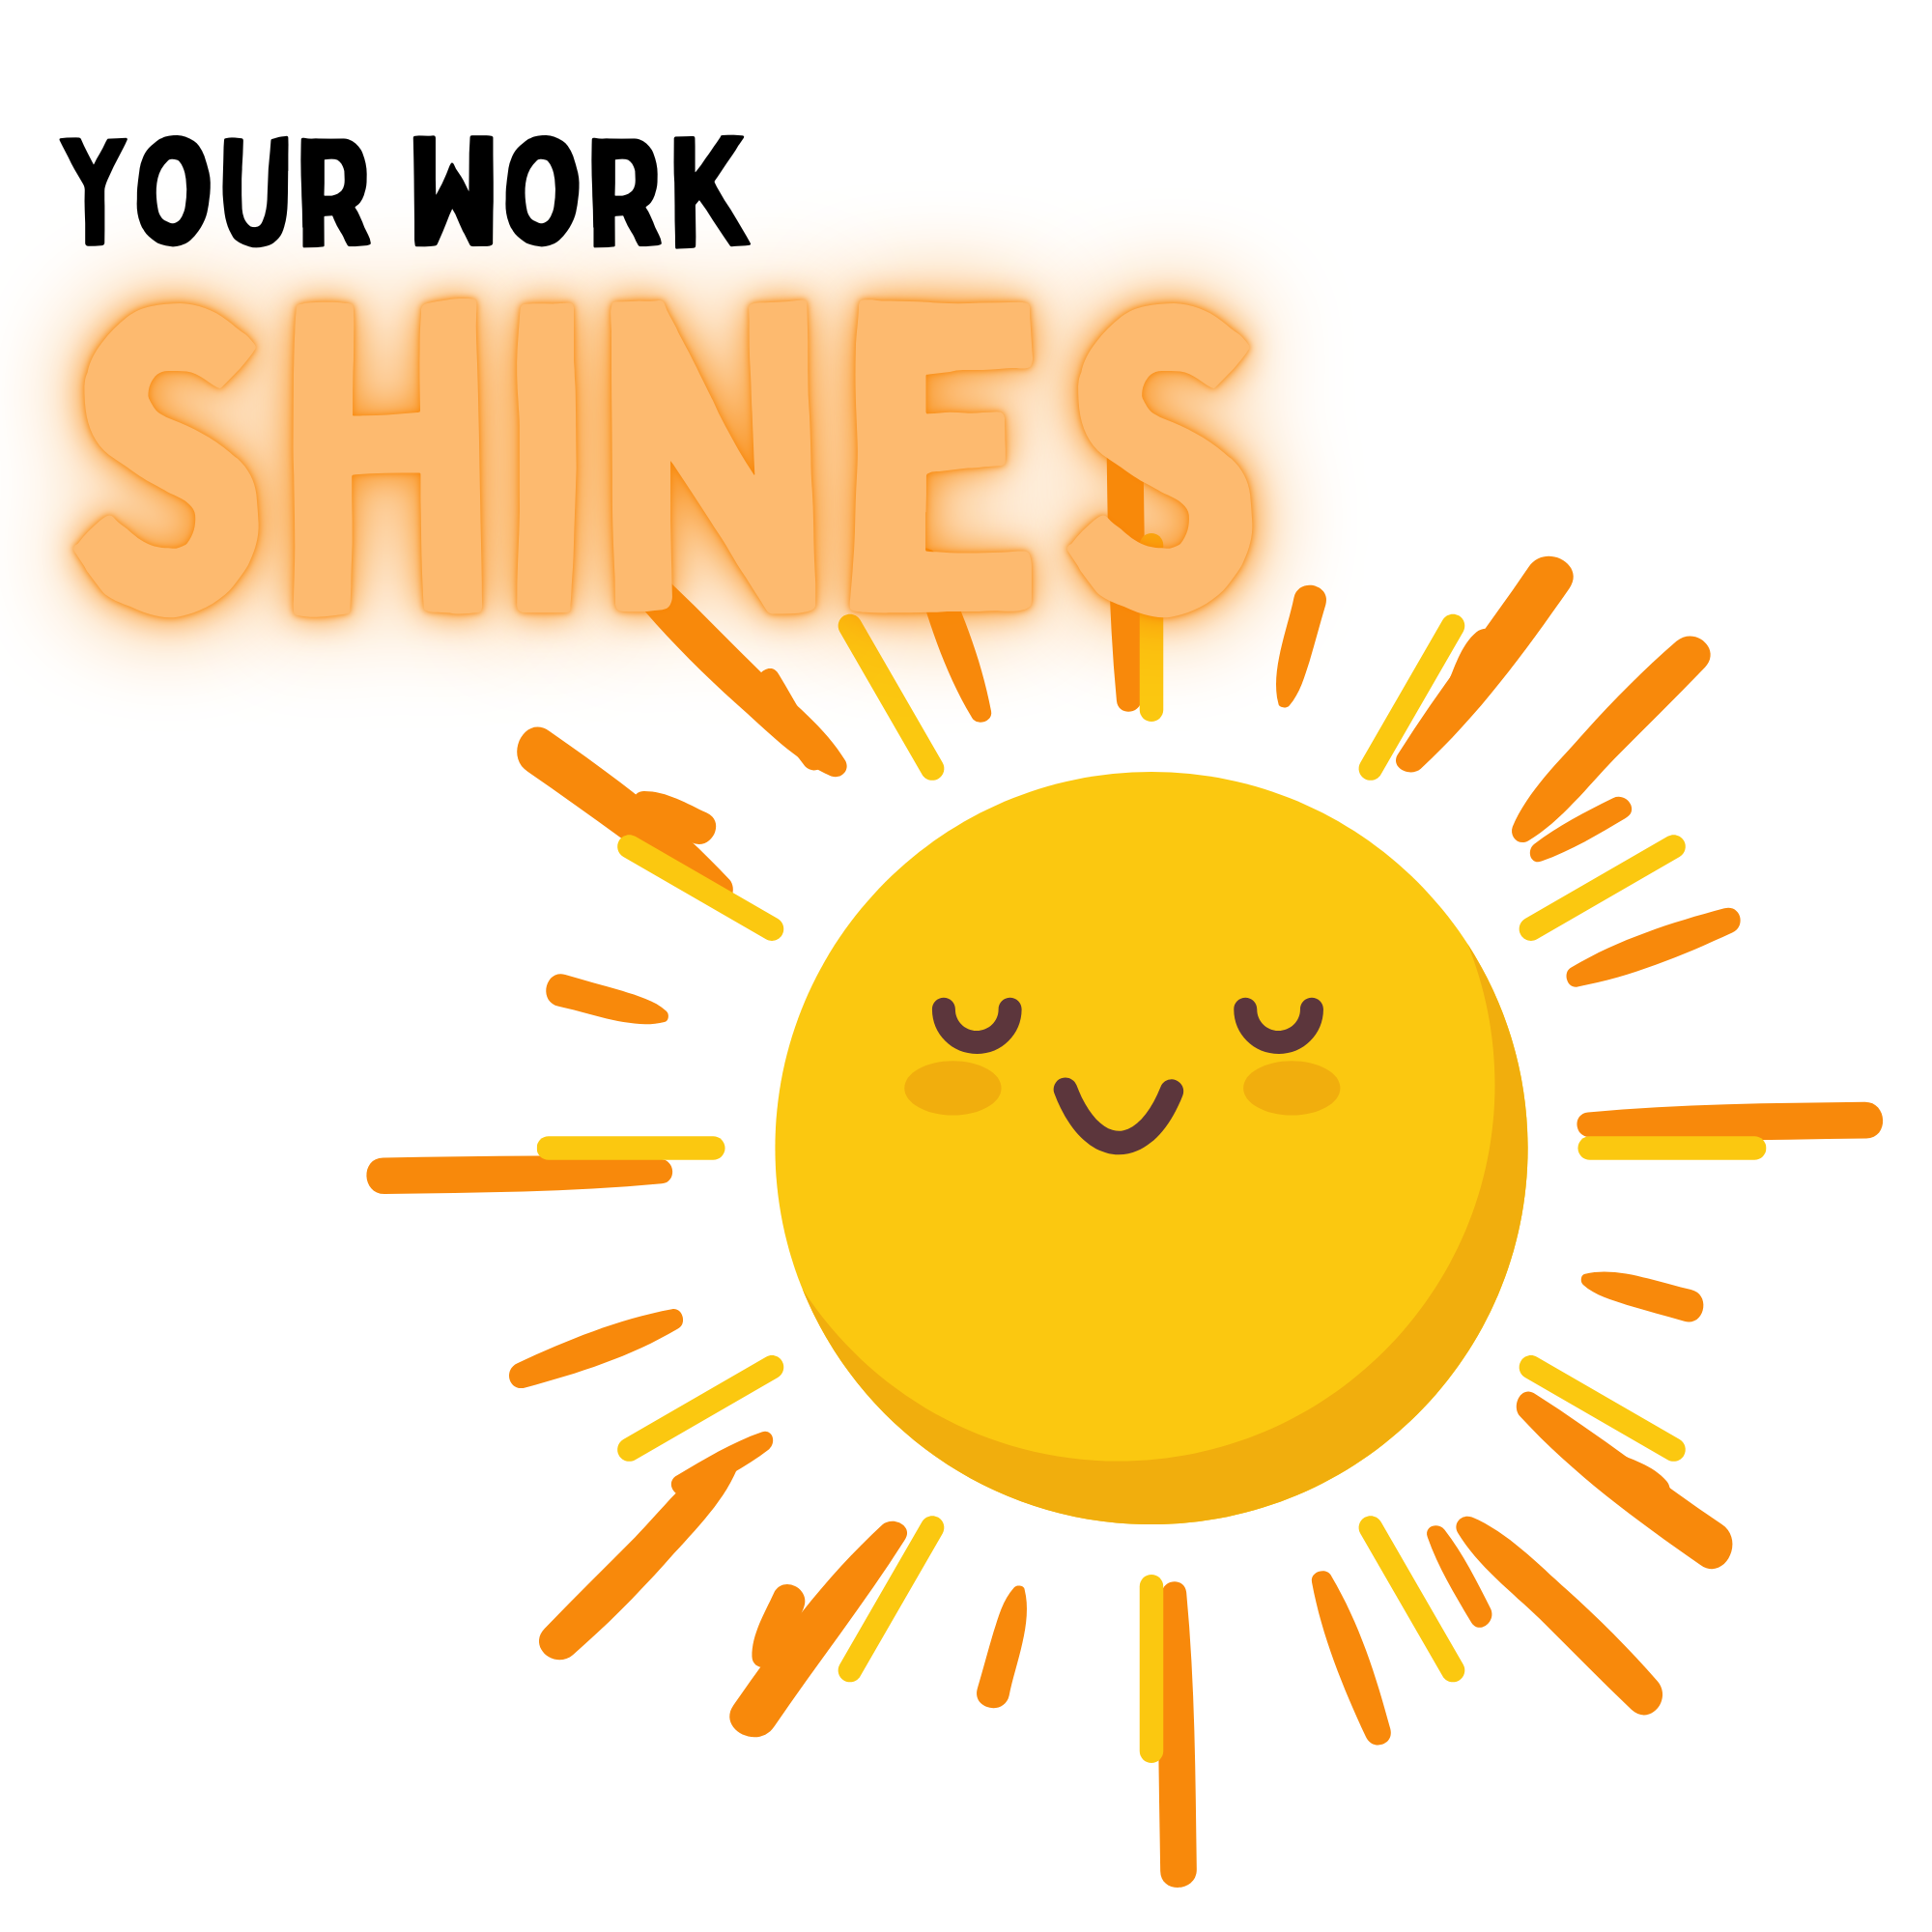
5. Continue with these steps, rotating the sun and adding a letter to shines until you have the word shines spelled out. I ended up with 7 pages.

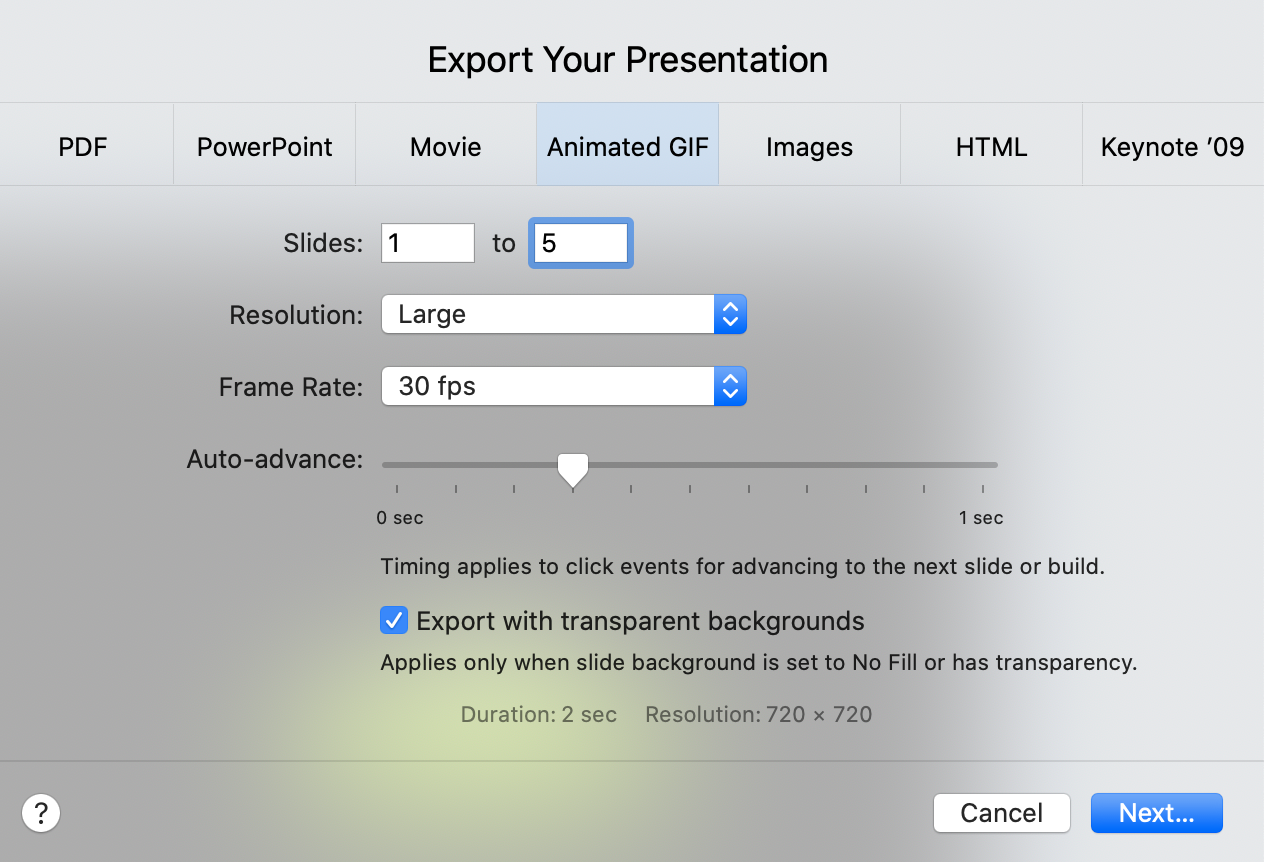
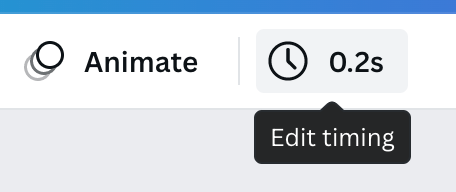
6. Now the fun part begins. First we want to set the timing for our stop motion. The timing is located in the top bar. I set mine to 0.2 but you can play around with this. 0.1 is faster, 0.3 is slower.

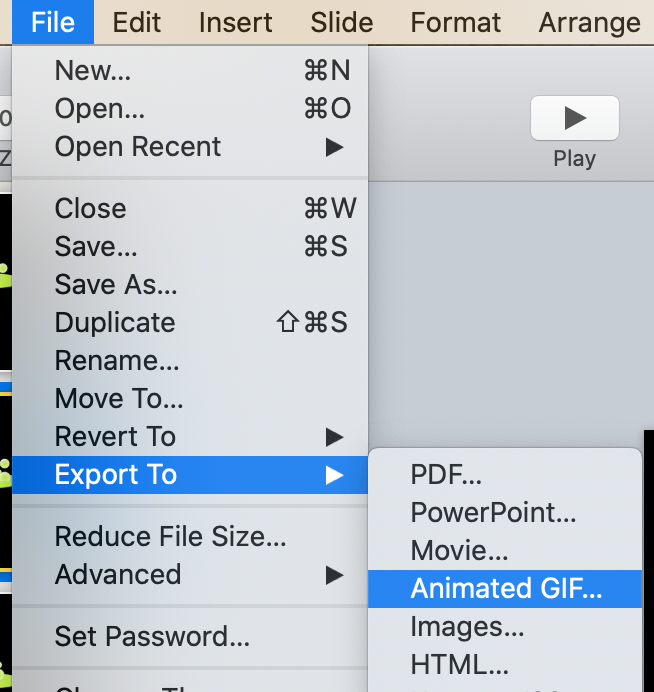
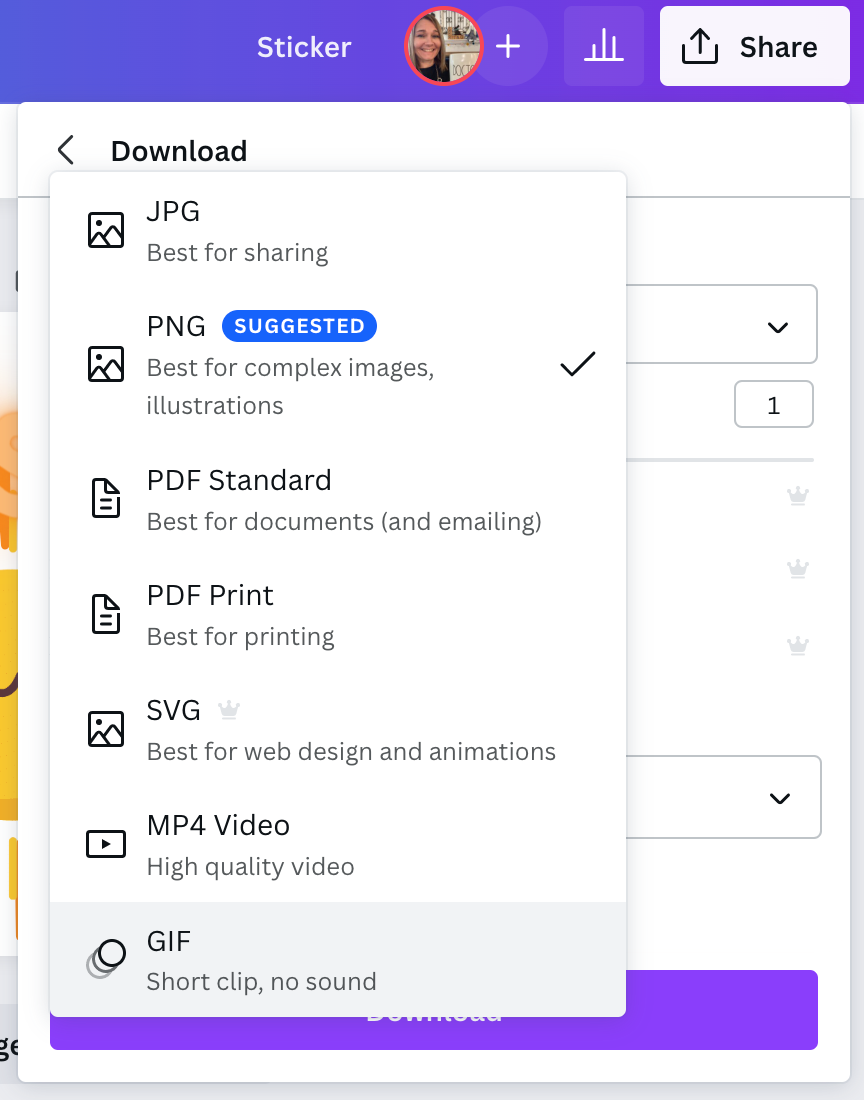
7. Now it’s time to download our design. Click the share button, then download, then select GIF at the bottom.

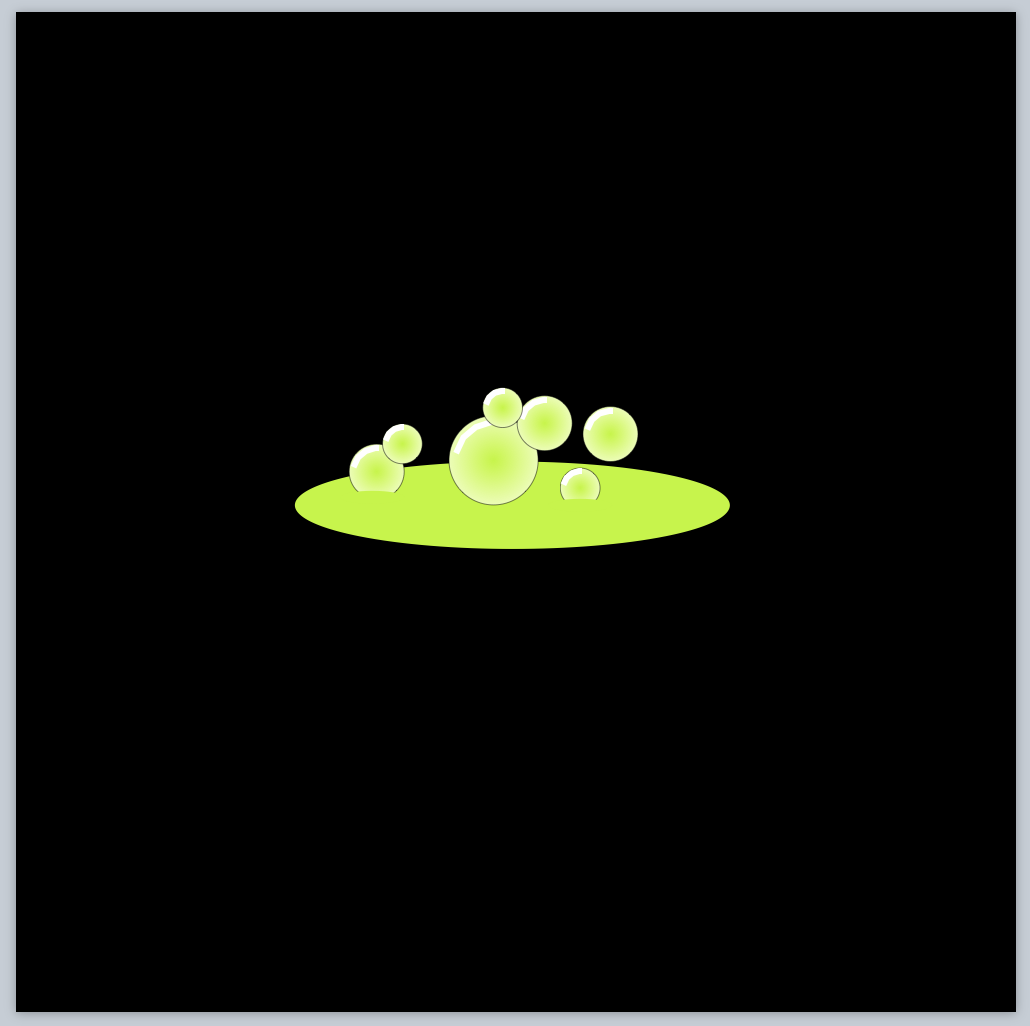
Here is you animated sticker. This isn’t the only way to animate stickers in Canva. This is actually very similar to the Google Slides process. These are also not transparent but you can always try unscreen.com. Sometimes it works.

I hope you found this tutorial useful. As I have mentioned in previous posts, my students LOVE animated stickers on their digital work and I teach high school. These stickers are for everyone!! And look at that, I didn’t use a Bitmoji even though you can connect your Bitmoji to Canva. What?!? Maybe we can do that the next time.

animated gif, Keynote, Stop Motion

Transparent Stop Motion

A few years ago, I posted about how to make Stop Motion animated GIFs using Google Slides and Tall Tweets. You can see that tutorial HERE.

Tall Tweets Update (not transparent)

Since that time, Tall Tweets has made some updates. So before I launch into how to make TRANSPARENT stop motion animations, let me show you the Tall Tweets update. Google Slides and Tall Tweets, as of this post, will not allow for transparent gifs. Maybe that is an update they can make soon (I did reach out on Twitter, so we’ll see if they can make it happen!). Tall Tweets did update with an add-on so you no longer have to go to the TallTweets site once you install.

Go to TallTweets and click Creator Studio (see image below). It will ask you to install.

Once installed, open a previous Stop Motion Google Slide or create a new one. When you are ready to create your animated GIF, go to add-ons and click Creator Studio. It will ask you to authorize the first time. Once you authorize, you will have to go to add-ons and click it again to make it run.

A panel will open on the right. Set your slide time. In Tall Tweets I started with .2 so that’s what I will try here.

Scroll to the bottom and click GO. You will have the option to download or view. You can view it to see if you need to adjust the time. When you are ready, click the download button and use the image like before. Notice that in Creator Studio you also have the option to make a video instead of a gif if you want to.

It’s a nice little update and added a few features. But sometimes you just need a transparent gif. I wanted to create a bubbling cauldron that I could use in an escape room but also in a presentation. I also wanted to create some googley eyes to use in a presentation. I created both in Keynote.

Keynote for Transparent GIFs

Open a new Keynote document and set the size you want. I like to make mine square but it can be any size. Go to document in the top right corner and change widescreen to custom size and change it to 500 pts by 500 pts.

Now create your animation, just like we did in Google Slides. Duplicate, change a little, duplicate, change a little,… Once your creation is ready, now we want to change the background to transparent. We don’t want to do this until the end because it turns black which is difficult to work on.

Under format (top right corner) switch background to no fill.

Your image will go from the first to the second.

If you have a lot of slides, you might want to make this change is slide layout, it will change all of the slides at once. If not, you can just change slide by slide.

Now we are ready to export our animation. Go to file, export to, animated GIF.

I choose these settings, but you can adjust the slider to make your gif work the way you want. I ended up sliding the slider to 3 for my cauldron. Also make sure you you start at slide one and include all of your slides. It will default to the one slide you are on.

Now you have a transparent image to use anywhere an animated gif can be used.

PowerPoint

PowerPoint will also export to an animated gif. I used to change my speed below one frame per second, but recently I haven’t been able to do this. This makes your animation SOOOO SLOOOOOW. For this reason I will no longer be able to recommend PowerPoint to make animated GIFS. If you know a work around for this, please let me know!!!!

I hope this helps you up your animated gif game! Please tag me on Twitter or Instagram if you make something! I LOVE LOVE LOVE to see them!